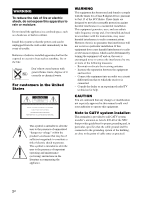
Sony STR-DG2100 Operating Instructions - Page 7
Off/a/b/a+b, Auto Cal Mic - same
 |
View all Sony STR-DG2100 manuals
Add to My Manuals
Save this manual to your list of manuals |
Page 7 highlights
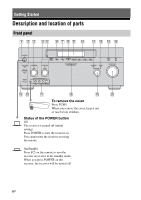
Getting Started Name Function A POWER Press to turn the receiver on or off. B AUTO CAL MIC Connects to the jack supplied optimizer microphone for the Digital Cinema Auto Calibration function (page 43). C TONE MODE TONE Adjusts FRONT/ CENTER/ SURROUND/ SURROUND BACK BASS and TREBLE. Press TONE MODE repeatedly to select BASS or TREBLE, then turn TONE to adjust the level. D MEMORY/ Press to operate a tuner ENTER (FM/AM) and satellite TUNING MODE radio (XM/SIRIUS) (page 111-113). TUNING E Remote sensor Receives signals from remote commander. F DIMMER Press repeatedly to adjust brightness of the display. G DISPLAY Press repeatedly to select information displayed on the display. H SUR BACK DECODING Press to activate SB DECODING (page 68). I Display window The current status of the selected component or a list of selectable items appears here (page 100). Name Function J 2CH/A.DIRECT Press to select sound A.F.D. field (page 59). MOVIE MUSIC K INPUT MODE Press to select the input mode when the same components are connected to both digital and analog jacks (page 96). L MUTING Press to turn off the sound temporarily. Press the button again to restore the sound. M DMPORT Press to select the audio/video input signal from the component connected to the DIGITAL MEDIA PORT adapter (page 21, 91). N HDMI Press to select input source from the component connected to the HDMI IN jack. O PHONES jack Connects to headphones. P SPEAKERS Switch to OFF, A, B, (OFF/A/B/A+B) A+B of the front speakers (page 42). Q VIDEO 3 IN/ Connect to a portable PORTABLE AV audio/video component IN jacks such as a camcorder or video game. R MULTI CHANNEL DECODING lamp Lights up when multichannel audio signals are decoded. continued 7GB
-
 1
1 -
 2
2 -
 3
3 -
 4
4 -
 5
5 -
 6
6 -
 7
7 -
 8
8 -
 9
9 -
 10
10 -
 11
11 -
 12
12 -
13
-
14
-
15
-
16
-
17
-
18
-
19
-
20
-
21
-
22
-
23
-
24
-
25
-
26
-
27
-
28
-
29
-
30
-
31
-
32
-
33
-
34
-
35
-
36
-
37
-
38
-
39
-
40
-
41
-
42
-
43
-
44
-
45
-
46
-
47
-
48
-
49
-
50
-
51
-
52
-
53
-
54
-
55
-
56
-
57
-
58
-
59
-
60
-
61
-
62
-
63
-
64
-
65
-
66
-
67
-
68
-
69
-
70
-
71
-
72
-
73
-
74
-
75
-
76
-
77
-
78
-
79
-
80
-
81
-
82
-
83
-
84
-
85
-
86
-
87
-
88
-
89
-
90
-
91
-
92
-
93
-
94
-
95
-
96
-
97
-
98
-
99
-
100
-
101
-
102
-
103
-
104
-
105
-
106
-
107
-
108
-
109
-
110
-
111
-
112
-
113
-
114
-
115
-
116
-
117
-
118
-
119
-
120
-
121
-
122
-
123
-
124
-
125
-
126
-
127
-
128
-
129
-
130
-
131
-
132
-
133
-
134
 |
 |
