Sony STR-DG600 Operating Instructions - Page 33
Press AUTO CAL., Performing Auto Calibration
 |
View all Sony STR-DG600 manuals
Add to My Manuals
Save this manual to your list of manuals |
Page 33 highlights
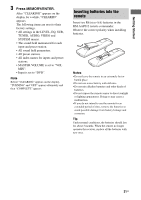
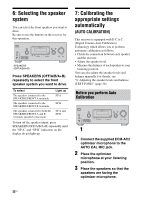
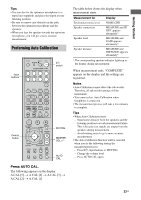
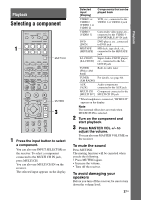
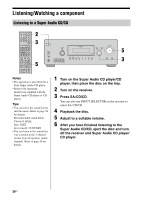
Getting Started Tips • You can also fix the optimizer microphone to a tripod (not supplied) and place the tripod at your listening position. • Be sure to remove any obstacles in the path between the optimizer microphone and the speakers. • When you face the speaker towards the optimizer microphone, you will get a more accurate measurement. Performing Auto Calibration Input buttons Control button TV ?/1 AV ?/1 ?/1 RM SET UP P SYSTEM STANDBY SLEEP VIDEO1 VIDEO2 VIDEO3 DVD MD/TAPE SA-CD/CD TUNER AUX MULTI CH 2CH A.F.D. MOVIE MUSIC 1 CATEGORY 2 3 DUAL CATEGORY MONO MODE 4 5 6 AUDIO ANGLE JUMP/ PRESET/ TUNING TIME CH/D.SKIP 7 8 9 MEMORY SUBTITLE ENTER .> 0/10 >10/11 12 D.TUNING DISC ALT mM - ANT CLEAR SEARCH MODE H TOP MENU/ GUIDE X x MUTING AV MENU F G g MASTER VOL f O DISPLAY TV VOL RETURN/EXIT TV/ AMP TV CH VIDEO MENU AUTO WIDE CAL ?/1 switch MUTING MASTER VOL +/- AUTO CAL Press AUTO CAL. The following appears on the display. A.CAL [5] t A.CAL [4] t A.CAL [3] t A.CAL [2] t A.CAL [1] The table below shows the display when measurement starts. Measurement for Environment noise level Speaker connection Speaker level Speaker distance Display NOISE.CHK MEASURE and SP DET. appears alternately* MEASURE and GAIN appears alternately* MEASURE and DISTANCE appears alternately* * The corresponding speaker indicator lights up in the display during measurement. When measurement ends, "COMPLETE" appears on the display and the settings are registered. Notes • Auto Calibration cannot detect the sub woofer. Therefore, all sub woofer settings will be maintained. • You cannot select Auto Calibration when headphone is connected. • The measurement process will take a few minutes to complete. Tips • When Auto Calibration starts: - Stand some distance from the speakers and the listening position to avoid measurement failure. This is because test signals are output from the speakers during measurement. - Avoid making noise to get a more accurate measurement. • The Auto Calibration function will be canceled when you do the following during the measurement process: - Press ?/1, input buttons or MUTING. - Change the volume level. - Press AUTO CAL again. 33US
-
 1
1 -
2
-
3
-
4
-
5
-
6
-
7
-
8
-
9
-
10
-
11
-
12
-
13
-
14
-
15
-
16
-
17
-
18
-
19
-
20
-
21
-
22
-
23
-
24
-
25
-
26
-
27
-
 28
28 -
 29
29 -
 30
30 -
 31
31 -
 32
32 -
 33
33 -
 34
34 -
 35
35 -
 36
36 -
 37
37 -
 38
38 -
39
-
40
-
41
-
42
-
43
-
44
-
45
-
46
-
47
-
48
-
49
-
50
-
51
-
52
-
53
-
54
-
55
-
56
-
57
-
58
-
59
-
60
-
61
-
62
-
63
-
64
-
65
-
66
-
67
-
68
-
69
-
70
-
71
-
72
-
73
-
74
-
75
-
76
-
77
-
78
-
79
-
80
-
81
-
82
-
83
-
84
-
85
-
86
-
87
-
88
 |
 |
