Sony STR-ZA1100ES Operating Instructions - Page 13
Preparation 1: Preparing the receiver and the remote control, cord mains lead to a wall outlet. - av receiver
 |
View all Sony STR-ZA1100ES manuals
Add to My Manuals
Save this manual to your list of manuals |
Page 13 highlights
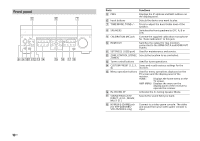
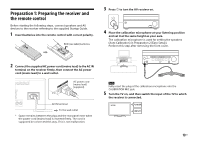
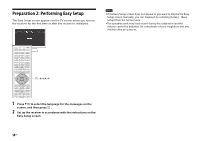
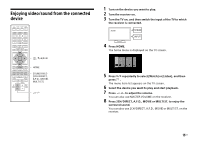
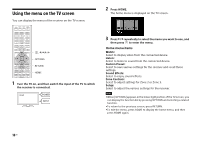
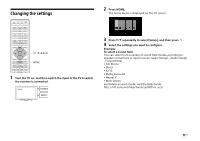
Preparation 1: Preparing the receiver and the remote control Before starting the following steps, connect speakers and AV devices to the receiver referring to the supplied Startup Guide. 1 Insert batteries into the remote control with correct polarity. R03 (size AAA) batteries 3 Press to turn the AV receiver on. 4 Place the calibration microphone at your listening position and set it at the same height as your ears. The calibration microphone is used for setting the speakers (Auto Calibration) in Preparation 2 (Easy Setup). Perform this step after removing the front cover. 2 Connect the supplied AC power cord (mains lead) to the AC IN terminal on the receiver firmly, then connect the AC power cord (mains lead) to a wall outlet. AC power cord (mains lead) (supplied) * AC IN terminal To the wall outlet * Space remains between the plug and the rear panel even when the power cord (mains lead) is inserted firmly. The cord is supposed be connected this way. This is not malfunction. Note Fully insert the plug of the calibration microphone into the CALIBRATION MIC jack. 5 Turn the TV on, and then switch the input of the TV to which the receiver is connected. 13US
-
 1
1 -
2
-
3
-
4
-
5
-
6
-
7
-
 8
8 -
 9
9 -
 10
10 -
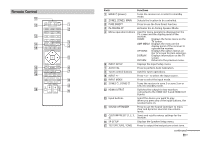 11
11 -
 12
12 -
 13
13 -
 14
14 -
 15
15 -
 16
16 -
 17
17 -
 18
18 -
19
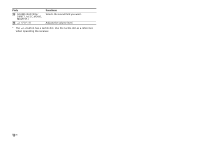
-
20
-
21
-
22
-
23
-
24
-
25
-
26
-
27
-
28
-
29
-
30
-
31
-
32
-
33
-
34
-
35
-
36
-
37
-
38
-
39
-
40
-
41
-
42
-
43
-
44
-
45
-
46
-
47
-
48
-
49
-
50
-
51
-
52
-
53
-
54
-
55
-
56
-
57
-
58
-
59
-
60
-
61
-
62
-
63
-
64
-
65
-
66
-
67
-
68
-
69
-
70
-
71
-
72
 |
 |
