Sony TMR-BT10 Instruction Manual - Page 6
Location and Function of Parts - pairing
 |
UPC - 027242697867
View all Sony TMR-BT10 manuals
Add to My Manuals
Save this manual to your list of manuals |
Page 6 highlights
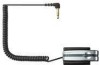
GETTING STARTED Location and Function of Parts 1 Initialize button 2 Indicator (red) Indicates the power status of the unit. 3 Indicator (blue) Indicates the communication status of the unit. 4 POWER button 5 Audio in plug (Goldplated L-shaped stereo mini plug) Connects to the headphone jack of a portable audio player, etc. 6 US 6 RESET button Press when the unit becomes inoperative. Pairing information is not deleted by this operation. 7 Holding clip Adjust the holding clip to the desired angle and clip to your bag. 8 Terminal for the battery charging stand
-
 1
1 -
 2
2 -
 3
3 -
 4
4 -
 5
5 -
 6
6 -
 7
7 -
 8
8 -
 9
9 -
 10
10 -
 11
11 -
 12
12 -
13
-
14
-
15
-
16
-
17
-
18
-
19
-
20
-
21
-
22
-
23
-
24
-
25
-
26
-
27
-
28
-
29
-
30
-
31
-
32
-
33
-
34
-
35
-
36
-
37
-
38
-
39
-
40
-
41
-
42
-
43
-
44
 |
 |

6
US
Location and Function of Parts
GETTING STARTED
1
Initialize button
2
Indicator (red)
Indicates the power status of
the unit.
3
Indicator (blue)
Indicates the communication
status of the unit.
4
POWER button
5
Audio in plug (Gold-
plated L-shaped stereo
mini plug)
Connects to the headphone
jack of a portable audio
player, etc.
6
RESET button
Press when the unit becomes
inoperative.
Pairing information is not
deleted by this operation.
7
Holding clip
Adjust the holding clip to the
desired angle and clip to your
bag.
8
Terminal for the battery
charging stand