Sony TMR-IF540R Operating Instructions - Page 6
meets the transmitter's contact, pin while making sure that
 |
View all Sony TMR-IF540R manuals
Add to My Manuals
Save this manual to your list of manuals |
Page 6 highlights
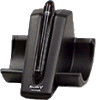
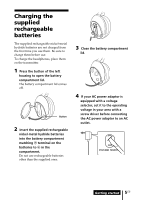
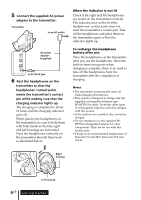
5 Connect the supplied AC power adaptor to the transmitter. Transmitter to an AC outlet AC power adaptor (supplied) to DC IN 9V jack 6 Rest the headphones on the transmitter so that the headphones' contact point meets the transmitter's contact pin while making sure that the charging indicator lights up. The charging is completed in about 16 hours and the charging indicator goes off. When placing the headphones on the transmitter, be sure to hold them with both hands so that the right and left housings are horizontal. Place the headphones vertically on the transmitter then tilt them back as illustrated below. When the indicator is not lit Check if the right and left headphones are rested on the transmitter correctly. The indicator may not be lit if the headphones' contact point does not meet the transmitter's contact pin. Take off the headphones and place them on the transmitter again so that the indicator lights up. To recharge the headphone battery after use Place the headphones on the transmitter after you use the headphones. Since the built-in timer recognizes when charging is complete, there is no need to take off the headphones from the transmitter after the completion of charging. Notes •The transmitter automatically turns off while charging the batteries. •This system is designed to charge only the supplied rechargeable batteries type BP-HP550 for safety. Note that other types of rechargeable batteries cannot be charged with this system. •If dry batteries are installed, they cannot be charged. •Do not attempt to use the supplied BPHP550 rechargeable batteries for other components. They are for use with this system only. •Charge in an environmental temperature of between 0˚C and 40˚C (between 32˚F and 104˚F). Right housing Left housing 6GB Getting started
-
 1
1 -
 2
2 -
 3
3 -
 4
4 -
 5
5 -
 6
6 -
 7
7 -
 8
8 -
 9
9 -
 10
10 -
 11
11 -
 12
12 -
13
-
14
-
15
-
16
-
17
-
18
-
19
-
20
-
21
-
22
-
23
-
24
-
25
-
26
-
27
-
28
-
29
-
30
-
31
-
32
-
33
-
34
-
35
-
36
-
37
-
38
-
39
-
40
-
41
-
42
-
43
-
44
 |
 |
