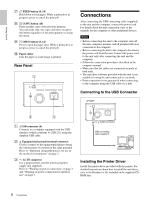
Sony UP-D895 User Instructions - Page 11
Basic Menu Operations - drivers
 |
View all Sony UP-D895 manuals
Add to My Manuals
Save this manual to your list of manuals |
Page 11 highlights
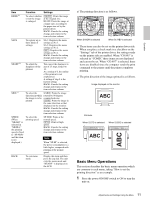
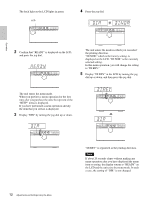
Operation Item RSIZE b) Function Settings To select whether or not the image is enlarged [RS:OFF]: Prints the image at the original size. RS:ON: Prints the image at a larger size, according to the paper size set by the printer driver. BACK: Cancels the setting change and returns to the item selection column. SAVE SHARP b) SIDE c) To register up to three kinds of settings SA:3: Registers the menu settings as No.3. SA:2: Registers the menu settings as No.2. [SA:1]: Registers the menu settings as No.1. BACK: Cancels the setting change and returns to the item selection column. To adjust the sharpness of the printout You can set the sharpness to any of 15 steps, from 0 to 14. At a setting of 0, the outline of the printout is not emphasized. A setting of step 2 is the factory setting. BACK: Cancels the setting change and returns to the item selection column. To select the S:SIDE: Prints the image direction in which rotated by 90 degrees the image is to be counterclockwise. printed [S:STD]: Prints the image in the same direction as that displayed on the monitor. BACK: Cancels the setting change and returns to the item selection column. SPEED To select the (When printing speed "ME:HD" is selected in "MEDIA," the printing speed is fixed to "SP:NOR" and this item is not displayed.) SP:NOR: Prints at the normal speed. [SP:HI]: Prints at high speed. BACK: Cancels the setting change and returns to the item selection column. Note When "SP:HI" is selected, the power consumption is a little higher, compared with printing at the normal speed. BACK To exit menu mode Display this item and then press the jog dial. The unit exits the menu mode and "READY" is displayed on the LCD. a) The printing direction is as follows. When DI:NOR is selected When DI: REV is selected b) These items can also be set on the printer driver side. When you place a check mark in a checkbox on the "Settings" tab of the printer driver, the settings made on the printer side are enabled. When "CO:895" is selected in "COMD," these items are not displayed and can not be set. When "CO:897" is selected, these items are disabled since the computer sends the print command to the printer until the printer completes printing. c) The print direction of the images printed is as follows. Image displayed on the monitor Printouts When S:STD is selected. When S:SIDE is selected Basic Menu Operations This section describes the basic menu operation which are common to each menu, taking "How to set the printing direction" as an example. 1 Press the power ON/OFF switch to ON to turn the unit on. 11 Adjustments and Settings Using the Menu
-
 1
1 -
2
-
3
-
4
-
5
-
 6
6 -
 7
7 -
 8
8 -
 9
9 -
 10
10 -
 11
11 -
 12
12 -
 13
13 -
 14
14 -
 15
15 -
 16
16 -
17
-
18
-
19
-
20
-
21
-
22
 |
 |
