Sony VGC-RA810G VAIO User Guide (Large File - 10.98 MB) - Page 200
Replacing the drive holder, Replace the side panel. See
 |
View all Sony VGC-RA810G manuals
Add to My Manuals
Save this manual to your list of manuals |
Page 200 highlights
Your new hard disk drive is supplied with the necessary screws. Do not overtighten these screws when securing the drive to the drive holder. 9. Align the drive holder with the tracks on the inside of the chassis. Slide the drive holder in completely. 10. Push the drive holder handle down to lock the drive into position. 11. Connect the second drive connector to the new drive. Orient the connector to align pin 1 on the red side of the ribbon cable with pin 1 on the new drive. 12. Connect the second power connector to the new drive following the instructions supplied with the drive. Replacing the driv e holder 13. Replace the side panel. See About Closing the Computer. 14. Reconnect the power cord to your computer. Page 200
-
 1
1 -
2
-
3
-
4
-
5
-
6
-
7
-
8
-
9
-
10
-
11
-
12
-
13
-
14
-
15
-
16
-
17
-
18
-
19
-
20
-
21
-
22
-
23
-
24
-
25
-
26
-
27
-
28
-
29
-
30
-
31
-
32
-
33
-
34
-
35
-
36
-
37
-
38
-
39
-
40
-
41
-
42
-
43
-
44
-
45
-
46
-
47
-
48
-
49
-
50
-
51
-
52
-
53
-
54
-
55
-
56
-
57
-
58
-
59
-
60
-
61
-
62
-
63
-
64
-
65
-
66
-
67
-
68
-
69
-
70
-
71
-
72
-
73
-
74
-
75
-
76
-
77
-
78
-
79
-
80
-
81
-
82
-
83
-
84
-
85
-
86
-
87
-
88
-
89
-
90
-
91
-
92
-
93
-
94
-
95
-
96
-
97
-
98
-
99
-
100
-
101
-
102
-
103
-
104
-
105
-
106
-
107
-
108
-
109
-
110
-
111
-
112
-
113
-
114
-
115
-
116
-
117
-
118
-
119
-
120
-
121
-
122
-
123
-
124
-
125
-
126
-
127
-
128
-
129
-
130
-
131
-
132
-
133
-
134
-
135
-
136
-
137
-
138
-
139
-
140
-
141
-
142
-
143
-
144
-
145
-
146
-
147
-
148
-
149
-
150
-
151
-
152
-
153
-
154
-
155
-
156
-
157
-
158
-
159
-
160
-
161
-
162
-
163
-
164
-
165
-
166
-
167
-
168
-
169
-
170
-
171
-
172
-
173
-
174
-
175
-
176
-
177
-
178
-
179
-
180
-
181
-
182
-
183
-
184
-
185
-
186
-
187
-
188
-
189
-
190
-
191
-
192
-
193
-
194
-
 195
195 -
 196
196 -
 197
197 -
 198
198 -
 199
199 -
 200
200 -
 201
201 -
 202
202 -
 203
203 -
 204
204 -
 205
205 -
206
-
207
-
208
-
209
-
210
-
211
-
212
-
213
-
214
-
215
-
216
-
217
-
218
-
219
-
220
-
221
-
222
-
223
-
224
-
225
-
226
-
227
-
228
-
229
-
230
-
231
-
232
-
233
-
234
-
235
-
236
-
237
-
238
-
239
-
240
-
241
-
242
-
243
-
244
-
245
-
246
-
247
-
248
-
249
-
250
-
251
-
252
-
253
-
254
 |
 |

Your new hard disk drive is supplied with the necessary screws. Do not overtighten these screws when securing
the drive to the drive holder.
9.
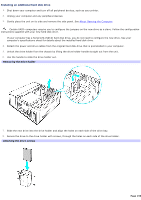
Align the drive holder with the tracks on the inside of the chassis. Slide the drive holder in completely.
10.
Push the drive holder handle down to lock the drive into position.
11.
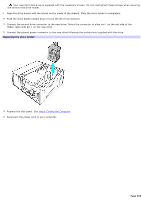
Connect the second drive connector to the new drive. Orient the connector to align pin 1 on the red side of the
ribbon cable with pin 1 on the new drive.
12.
Connect the second power connector to the new drive following the instructions supplied with the drive.
Replacing the drive holder
13.
Replace the side panel. See
About Closing the Computer
.
14.
Reconnect the power cord to your computer.
Page 200