Sony VPL CS21 Quick Reference Guide - Page 21
Disposal of the used lamp, For the customers in the USA - replacement lamp
 |
UPC - 027242693562
View all Sony VPL CS21 manuals
Add to My Manuals
Save this manual to your list of manuals |
Page 21 highlights
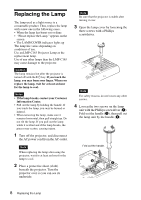
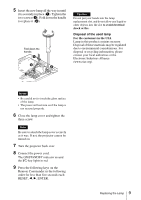
5 Insert the new lamp all the way in until it is securely in place (a). Tighten the two screws (c). Fold down the handle to replace it (b). Fold down the handle. Caution Do not put your hands into the lamp replacement slot, and do not allow any liquid or other objects into the slot to avoid electrical shock or fire. Disposal of the used lamp For the customers in the USA Lamp in this product contains mercury. Disposal of these materials may be regulated due to environmental considerations. For disposal or recycling information, please contact your local authorities or the Electronic Industries Alliance (www.eiae.org). Notes • Be careful not to touch the glass surface of the lamp. • The power will not turn on if the lamp is not secured properly. 6 Close the lamp cover and tighten the three screw. Note Be sure to attach the lamp cover securely as it was. If not, the projector cannot be turned on. 7 Turn the projector back over. 8 Connect the power cord. The ON/STANDBY indicator around the ?/1 key lights in red. 9 Press the following keys on the Remote Commander in the following order for less than five seconds each: RESET, b, B, ENTER. Replacing the Lamp 9
-
 1
1 -
2
-
3
-
4
-
5
-
6
-
7
-
8
-
9
-
10
-
11
-
12
-
13
-
14
-
15
-
 16
16 -
 17
17 -
 18
18 -
 19
19 -
 20
20 -
 21
21 -
 22
22 -
 23
23 -
 24
24 -
 25
25 -
 26
26 -
27
-
28
-
29
-
30
-
31
-
32
-
33
-
34
-
35
-
36
-
37
-
38
-
39
-
40
-
41
-
42
-
43
-
44
-
45
-
46
-
47
-
48
-
49
-
50
-
51
-
52
-
53
-
54
-
55
-
56
-
57
-
58
-
59
-
60
-
61
-
62
-
63
-
64
-
65
-
66
-
67
-
68
-
69
-
70
-
71
-
72
-
73
-
74
-
75
-
76
-
77
-
78
-
79
-
80
-
81
-
82
-
83
-
84
-
85
-
86
-
87
-
88
 |
 |
