Sony WX-4500X Installation/Connections Instructions - Page 3
Atoyota/mitsubishi Bnissan - cd
 |
View all Sony WX-4500X manuals
Add to My Manuals
Save this manual to your list of manuals |
Page 3 highlights
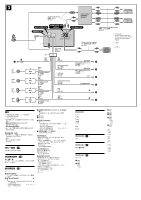
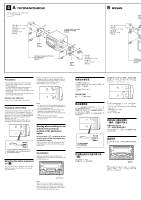
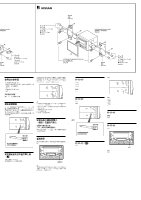
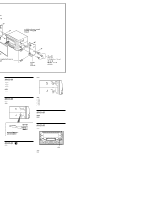
4 A TOYOTA/MITSUBISHI This illustration is for TOYOTA cars f 1 or 2 max. size 5 × 8 mm (7/32 × 11/32 in.) 1 2 Bracket Existing parts supplied with your car to dashboard/center console Bracket 1 or 2 max. size 5 × 8 mm (7/32 × 11/32 in.) 1 2 B NISSAN 1 or 2 max. size 5 × 8 mm (7/32 × 11/32 in.) 1 2 Bracke 3 Existing parts Precautions •Choose the installation location carefully so that the unit will not interfere with normal driving operations. •Avoid installing the unit in areas subject to dust, dirt, excessive vibration, or high temperatures, such as in direct sunlight or near heater ducts. •Use only the supplied mounting hardware for a safe and secure installation. Mounting angle adjustment Adjust the mounting angle to less than 20°. Frequency select switch The AM (FM) tuning interval is factory-set to the 9 k (50 k) position. If the frequency allocation system of your country is based on 10 kHz (200 kHz) interval, set the switch on the left side of the unit to the 10 k (200 k) position before making connections. After the frequency select switch is set, you must press the reset button to reset the unit. When mounting this unit to the preinstalled brackets of your car, use the supplied screws 1 or 2 in the appropriate screw holes, according to your vehicle: T for TOYOTA, M for MITSUBISHI, and N for NISSAN. N T M M T N T T N N T N M Notes • Use the screws 1 or 2 depending on the make of car. When this unit is attached to a MITSUBISHI car, use the supplied screws 2. • To prevent malfunction, be sure to install using brackets and the supplied screws 1 or 2. • Do not apply excessive force to the buttons of the unit. • Do not push on the display window. • Before mounting, make sure there is nothing on the top of the unit. N T M M T N T T N N T N M Warning when installing in a car without ACC (accessory) position on the ignition key switch Be sure to press (OFF) on the unit for two seconds to turn off the clock display after turning off the engine. When you press (OFF) only momentarily, the clock display does not turn off and this causes battery wear. To set the frequency select switch, use a pointed object, such as a ball-point pen, to gently slide the switch. Mounting the unit in a Japanese car (4) You may not be able to install this unit in some makes of Japanese cars. In such a case, consult your Sony dealer. Reset button When the installation and connections are completed, be sure to press the reset button with a ball-point pen, etc. CD DSO SCRL OFF SA SOUND MENU SEEK/AMS EQ7 DSPL AT T MD SEEK/AMS MODE SOURCE Reset button Note When you connect the power supply cord to the unit or reset the unit, wait for about 10 seconds before you insert a disc. If you insert a disc within these 10 seconds, the unit will not be reset, and you will have to press the reset button again. d f d eา e eᛪd f d f f d 1 2d j d d f N T M M T N T T N N T N M f d d f d d f 1 2f d 2f d ക㕐1 2f f f d f N T M M T N T T N N T N M d OFF f OFF)d f d f ࠠሜܲඐ d f CD DSO EQ7 4 d d f SCRL OFF SA SOUND MENU SEEK/AMS DSPL AT T MD SEEK/AMS MODE SOURCE ࠠሜܲඐ d f d d f
-
 1
1 -
 2
2 -
 3
3 -
 4
4 -
 5
5
 |
 |
