Sony XAV-A1 Operating Instructions - Page 12
Setting the clock, DEMO mode, Attaching the front panel, Touch SOURCE LIST., Touch MENU., Touch CLOCK. - parts
 |
View all Sony XAV-A1 manuals
Add to My Manuals
Save this manual to your list of manuals |
Page 12 highlights
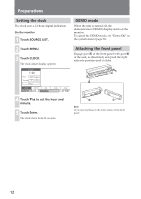
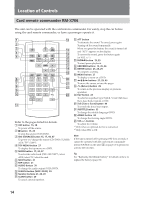
Preparations Setting the clock The clock uses a 12-hour digital indication. On the monitor 1 Touch SOURCE LIST. 2 Touch MENU. 3 Touch CLOCK. The clock adjust display appears. DEMO mode When the unit is turned off, the demonstration (DEMO) display starts on the monitor. To cancel the DEMO mode, set "Demo Off" in the system menu (page 36). Attaching the front panel Engage part A of the front panel with part B of the unit, as illustrated, and push the right side into position until it clicks. Enter SOURCE LIST 4 Touch V/v to set the hour and minute. 5 Touch Enter. The clock starts from 00 seconds. B A Note Do not put anything on the inner surface of the front panel. 12
-
 1
1 -
2
-
3
-
4
-
5
-
6
-
 7
7 -
 8
8 -
 9
9 -
 10
10 -
 11
11 -
 12
12 -
 13
13 -
 14
14 -
 15
15 -
 16
16 -
 17
17 -
18
-
19
-
20
-
21
-
22
-
23
-
24
-
25
-
26
-
27
-
28
-
29
-
30
-
31
-
32
-
33
-
34
-
35
-
36
-
37
-
38
-
39
-
40
-
41
-
42
-
43
-
44
-
45
-
46
-
47
-
48
-
49
-
50
-
51
-
52
-
53
-
54
-
55
-
56
-
57
-
58
-
59
-
60
-
61
-
62
-
63
-
64
-
65
-
66
-
67
-
68
-
69
-
70
-
71
-
72
-
73
-
74
-
75
-
76
-
77
-
78
-
79
-
80
-
81
-
82
-
83
-
84
-
85
-
86
-
87
-
88
-
89
-
90
-
91
-
92
-
93
-
94
-
95
-
96
-
97
-
98
-
99
-
100
-
101
-
102
-
103
-
104
-
105
-
106
-
107
-
108
-
109
-
110
-
111
-
112
-
113
-
114
-
115
-
116
-
117
-
118
-
119
-
120
-
121
-
122
-
123
-
124
-
125
-
126
-
127
-
128
-
129
-
130
-
131
-
132
-
133
-
134
-
135
-
136
-
137
-
138
-
139
-
140
-
141
-
142
-
143
-
144
-
145
-
146
-
147
-
148
-
149
-
150
-
151
-
152
-
153
-
154
-
155
-
156
-
157
-
158
-
159
-
160
-
161
-
162
-
163
-
164
-
165
-
166
-
167
-
168
-
169
-
170
-
171
-
172
-
173
-
174
-
175
-
176
-
177
-
178
-
179
-
180
-
181
-
182
-
183
-
184
 |
 |

12
Setting the clock
The clock uses a 12-hour digital indication.
On the monitor
1
Touch SOURCE LIST.
2
Touch MENU.
3
Touch CLOCK.
The clock adjust display appears.
Enter
SOURCE LIST
4
Touch
V
/
v
to set the hour and
minute.
5
Touch Enter.
The clock starts from 00 seconds.
Preparations
DEMO mode
When the unit is turned off, the
demonstration (DEMO) display starts on the
monitor.
To cancel the DEMO mode, set “Demo Off” in
the system menu (page 36).
Attaching the front panel
Engage part
A
of the front panel with part
B
of the unit, as illustrated, and push the right
side into position until it clicks.
A
B
Note
Do not put anything on the inner surface of the front
panel.