Sony ZS-D55 Users Guide - Page 33
Setting Up, Listening to TV, VCR and MiniDisc player, recorder, For MiniDisc recorder
 |
View all Sony ZS-D55 manuals
Add to My Manuals
Save this manual to your list of manuals |
Page 33 highlights
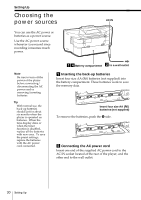
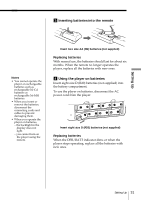
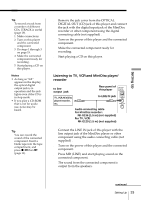
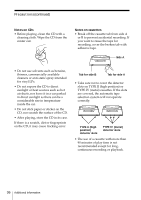
Setting Up Tip To record a track from a number of different CDs, 1TRACK is useful (page 19). 1 Make connections. 2 Turn on this player and the connected component. 3 Do steps 1 through 3 on page 19. 4 Make the connected component ready for recording. 5 Start playing a CD on this player. Notes • As long as "Cd" appears in the display, the optical digital output jack is in operation and the jack lights even if the CD is in stop mode. • If you play a CD-ROM that is not for audio use, noise may be heard. Tip You can record the sound of the connected component. Insert a blank tape into the tape compartment, and press z/X then N (page 11). 1 Remove the jack cover from the OPTICAL DIGITAL OUT (CD) jack of this player and connect the jack with the digital input jack of the MiniDisc recorder or other component using the digital connecting cable (not supplied) . 2 Turn on the power of this player and the connected component. 3 Make the connected component ready for recording. 4 Start playing a CD on this player. Listening to TV, VCR and MiniDisc player/ recorder to line output jack TV, VCR, MiniDisc player/recorder, etc. Rear panel of this player to LINE IN jack Audio connecting cable For MiniDisc recorder: RK-G136 (1.5 m) (not supplied) For TV, VCR: RK-G129 (1.5 m) (not supplied) 1 Connect the LINE IN jack of this player with the line output jack of the MiniDisc player or other component using the audio connecting cable (not supplied) . 2 Turn on the power of this player and the connected component. 3 Press MD (LINE) and start playing sound on the connected component. The sound from the connected component is output from the speakers. continued Setting Up 33
-
 1
1 -
2
-
3
-
4
-
5
-
6
-
7
-
8
-
9
-
10
-
11
-
12
-
13
-
14
-
15
-
16
-
17
-
18
-
19
-
20
-
21
-
22
-
23
-
24
-
25
-
26
-
27
-
 28
28 -
 29
29 -
 30
30 -
 31
31 -
 32
32 -
 33
33 -
 34
34 -
 35
35 -
 36
36 -
 37
37 -
 38
38 -
39
-
40
-
41
-
42
-
43
-
44
 |
 |
