Stihl FS 46 Product Instruction Manual - Page 9
Mounting the Deflector and Mounting - parts
 |
View all Stihl FS 46 manuals
Add to My Manuals
Save this manual to your list of manuals |
Page 9 highlights
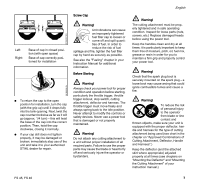
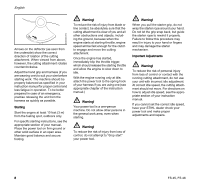
Left: Right: Base of cap in closed position (with open space) Base of cap correctly positioned for installation N To return the cap to the open position for installation, turn the cap (with the grip up) until it drops fully into the tank opening. Next, twist the cap counterclockwise as far as it will go (approx. 1/4 turn) - this will twist the base of the cap into the correct position. Then, twist the cap clockwise, closing it normally. N If your cap still does not tighten properly, it may be damaged or broken; immediately stop use of the unit and take it to your authorized STIHL dealer for repair. 001BA226 KN 001BA227 KN Screw Cap Warning! Unit vibrations can cause an improperly tightened fuel filler cap to loosen or come off and spill quantities of fuel. In order to reduce the risk of fuel spillage and fire, tighten the fuel filler cap by hand as securely as possible. See also the "Fueling" chapter in your Instruction Manual for additional information. Before Starting Warning! Always check your power tool for proper condition and operation before starting, particularly the throttle trigger, throttle trigger lockout, stop switch, cutting attachment, deflector and harness. The throttle trigger must move freely and always spring back to the idle position. Never attempt to modify the controls or safety devices. Never use a power tool that is damaged or not properly maintained. Warning! Do not attach any cutting attachment to a unit without proper installation of all required parts. Failure to use the proper parts may cause the blade or head to fly off and seriously injure the operator or bystanders. English Warning! The cutting attachment must be properly tightened and in safe operating condition. Inspect for loose parts (nuts, screws, etc.) Replace damaged heads before using the power tool. Keep the handles clean and dry at all times; it is particularly important to keep them free of moisture, pitch, oil, fuel mix, grease or resin in order for you to maintain a firm grip and properly control your power tool. Warning! Check that the spark plug boot is securely mounted on the spark plug - a loose boot may cause arcing that could ignite combustible fumes and cause a fire. Warning! To reduce the risk of personal injury to the operator from blade or line contact and thrown objects, make sure your unit is equipped with the proper deflector, handle and harness for the type of cutting attachment being used (see chart in the chapter on "Approved Combinations of Cutting Attachment, Deflector, Handle and Harness".) Keep the deflector (and the attached skirt where appropriate) adjusted properly at all times (see chapters on "Mounting the Deflector" and "Mounting the Cutting Attachment" of your instruction manual.) FS 45, FS 46 7
-
 1
1 -
2
-
3
-
 4
4 -
 5
5 -
 6
6 -
 7
7 -
 8
8 -
 9
9 -
 10
10 -
 11
11 -
 12
12 -
 13
13 -
 14
14 -
15
-
16
-
17
-
18
-
19
-
20
-
21
-
22
-
23
-
24
-
25
-
26
-
27
-
28
-
29
-
30
-
31
-
32
-
33
-
34
-
35
-
36
-
37
-
38
-
39
-
40
-
41
-
42
-
43
-
44
-
45
-
46
-
47
-
48
-
49
-
50
-
51
-
52
-
53
-
54
-
55
-
56
-
57
-
58
-
59
-
60
-
61
-
62
-
63
-
64
-
65
-
66
-
67
-
68
-
69
-
70
-
71
-
72
-
73
-
74
-
75
-
76
-
77
-
78
-
79
-
80
-
81
-
82
-
83
-
84
-
85
-
86
-
87
-
88
-
89
-
90
-
91
-
92
 |
 |
