TASCAM CD-A580 Owners Manual - Page 13
Power On Start Off-play-rec Tape Switch, Power On Start Cd-tape-usb Switch
 |
View all TASCAM CD-A580 manuals
Add to My Manuals
Save this manual to your list of manuals |
Page 13 highlights
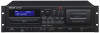
23 Play (t) button 14 Press this button to start CD playback. 24 Stop (H) button Press this button to stop CD playback. 25 Skip (.//)/Search (m/,) buttons Press these buttons to skip through files. Hold down these buttons to search for part of a file. 26 POWER ON START CD-TAPE-USB switch Use this switch to set the sound source that is active when the power is turned on. Use this switch to set the media used for timer playback/ recording. (The timer recording can only record to cassette tape.) To use timer playback/recording, connect a commerciallyavailable programmable timer to this unit (page 34). 27 Pause (J) button Press this button to pause USB playback or recording. Press this button again to resume playback or recording. 17 16 15 a 28 Play (t) button Press this button to start USB playback. When in USB recording standby, press this to start recording. 18 Play (t) button This starts cassette tape playback. Press when a cassette tape is paused to resume playback/ recording. 29 Stop (H) button Press this button to stop USB playback. Press this button also to stop recording to USB. 30 Disc tray 19 PITCH CONTROL knob Turn this knob to vary the playback speed (page 25). 20 Pause (J) button Press this button to pause CD playback. To resume playback, press this button again. 21 FOLDER ( / ) buttons Use these buttons to select folders (pages 19 and 27). 22 POWER ON START OFF-PLAY-REC (TAPE) switch Use this switch to set the timer operation mode (off, play or record). To use this when set to play or record, connect a commerciallyavailable programmable timer to this unit (page 34). oo Select OFF to not use timer playback or recording. 31 USB port Connect an external USB flash drive here. 32 POWER button Press this button to turn the unit on or off. ATTENTION Never turn the unit off or disconnect a USB flash drive when it is being accessed, for example, during writing, playback, recording or the erasure of files. Doing so could damage the unit and the connected USB flash drive. a Model name (V2) In order to distinguish it from the original CD-A580, the CD-A580 v2 has "V2" written on the front at the bottom right. Please be aware that the CD-A580 and CD-A580 v2 have different specifications for the file names and folder structures used when saving on USB flash drives (page 28). 13
-
 1
1 -
2
-
3
-
4
-
5
-
6
-
7
-
 8
8 -
 9
9 -
 10
10 -
 11
11 -
 12
12 -
 13
13 -
 14
14 -
 15
15 -
 16
16 -
 17
17 -
 18
18 -
19
-
20
-
21
-
22
-
23
-
24
-
25
-
26
-
27
-
28
-
29
-
30
-
31
-
32
-
33
-
34
-
35
-
36
-
37
-
38
-
39
-
40
-
41
-
42
-
43
-
44
 |
 |
