TASCAM Celesonic US-20x20 Software/Firmware Update procedures - Page 1
TASCAM Celesonic US-20x20 Manual
 |
View all TASCAM Celesonic US-20x20 manuals
Add to My Manuals
Save this manual to your list of manuals |
Page 1 highlights
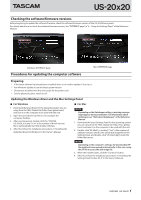
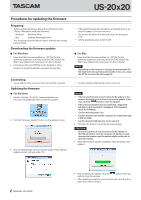
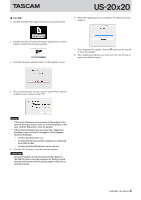
US-20x20 Checking the software/firmware versions Before beginning to update the software/firmware, check the software/firmware version of the US-20x20 being used. For details about how to check the software/firmware version, See "INTERFACE page" in "6 - Using the Settings Panel" of the Reference Manual. Windows INTERFACE page Procedures for updating the computer software Mac INTERFACE page Preparing • If the latest software has already been installed, there is no need to update it. Use it as is. • Run Windows Update to use the latest system version. • Disconnect all cables from the unit except for the power cord. • Set the phantom power switch to off. Updating the Windows driver and the Mac Settings Panel 88 For Windows 1. Download the latest driver for the operating system you are using from the TEAC Global Site (http://teac-global.com/) and save it on the computer to be used with the unit. 2. Open the saved driver (zip file) on, for example, the computer desktop. 3. After uncompression, double-click the "TASCAM_ US-20x20_x.xx.exe" ("x.xx" is the number of driver version) file to automatically start the installer software. 4. After this, follow the installation procedures in "Installing the dedicated driver for Windows" in the Owner's Manual. 88 For Mac NOTE • Depending on the Gatekeeper setting, a warning message might appear during installation. For information about Gatekeeper, see "Note about Gatekeeper" of the Reference Manual. 1. Download the latest Settings Panel for the operating system you are using from the TEAC Global Site (http://teac-global. com/) and save it on the computer to be used with the unit. 2. Double-click "US-20x20_x.xx.dmg" ("x.xx" is the number of software version), which is the saved disk image file for the Settings Panel, and double-click "US-20x20.pkg" inside the folder that opens. NOTE Depending on the computer's settings, the downloaded ZIP file might not have opened automatically. In this case, unzip the ZIP file to access the disk image file. 3. When the installer starts, click the "Continue" button. 4. After this, follow the installation procedures in "Installing the Settings Panel for Mac OS X" in the Owner's Manual. TASCAM US-20x20 1
-
 1
1 -
 2
2 -
 3
3
 |
 |
