TASCAM US-16x08 Owners Manual - Page 9
Attaching Rack Mount Angles, Connecting the power, Changing the outlet plug - power supply
 |
View all TASCAM US-16x08 manuals
Add to My Manuals
Save this manual to your list of manuals |
Page 9 highlights
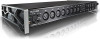
Attaching Rack Mount Angles To rack mount the unit, you must replace the side frames with the included rack mount angles. Follow the procedure below to replace them. (Have a Phillips screwdriver ready.) 1. Using the hex key included with the product, remove the four screws from each side of the unit, as indicated in the following figure. In order to prevent the cord from becoming disconnected during use, wrap the cord around the cord holder. 2. Remove the frame from each side of the unit. 3. Attach the included rack mount angles to the unit using the included rack mount angle attachment screws and the Phillips screwdriver. 4. To reattach the original frames, reverse the above procedure. Connecting the power Use the included AC adapter to connect a power supply to the unit as shown below. • The AC adapter includes two types of outlet plugs. Attach the type of plug that matches the power outlet that you are using. Power outlet GPE248-120200-Z (included) DC plug CAUTION Always use the dedicated AC adapter (GPE248-120200-Z, DC12V) that was shipped with the unit. Using a different AC adapter could cause malfunction, overheating, fire or other problems. Changing the outlet plug 3 2 $ 5 % 1 4 1. Move the latch on the AC adapter in the direction of the arrow. 2. Pull off the outlet plug. 3. Replace it with the other outlet plug (A or B). 4. Move the latch on the AC adapter in the direction of the arrow again. 5. Attach the outlet plug to the AC adapter. This completes changing the outlet plug. After changing the outlet plug, confirm that it is not loose or crooked and that everything is normal before plugging it into an outlet. CAUTION Do not use the adapter if there is anything abnormal about the plug after changing it. Use when the plug is abnormal could cause fire or electric shock. Contact the retailer where you purchased the unit or a TEAC service center (on the back cover) to request repair. TASCAM US-16x08 9
-
 1
1 -
2
-
3
-
 4
4 -
 5
5 -
 6
6 -
 7
7 -
 8
8 -
 9
9 -
 10
10 -
 11
11 -
 12
12 -
 13
13 -
 14
14 -
15
-
16
-
17
-
18
-
19
-
20
-
21
-
22
-
23
-
24
-
25
-
26
-
27
-
28
-
29
-
30
-
31
-
32
-
33
-
34
-
35
-
36
-
37
-
38
-
39
-
40
-
41
-
42
-
43
-
44
-
45
-
46
-
47
-
48
-
49
-
50
-
51
-
52
-
53
-
54
-
55
-
56
-
57
-
58
-
59
-
60
-
61
-
62
-
63
-
64
-
65
-
66
-
67
-
68
-
69
-
70
-
71
-
72
-
73
-
74
-
75
-
76
-
77
-
78
-
79
-
80
-
81
-
82
-
83
-
84
-
85
-
86
-
87
-
88
-
89
-
90
-
91
-
92
 |
 |
