TEAC P-55-111 Instruction Manual - Page 17
Control Panel Features
 |
View all TEAC P-55-111 manuals
Add to My Manuals
Save this manual to your list of manuals |
Page 17 highlights
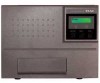
SECTION 9 : Control Panel Features 1 LCD display: reports status information, etc. 2 READY lamp: lights up to show that the printer is ready and can start printing. A circle (o) is displayed in the upper right corner of the LCD to indicate that the disc tray holds a print medium. 3 ERROR lamp: lights up when an error develops. A brief error message is displayed on the LCD. For details on error messages, refer to SECTION 11 : Error Messages Explained. 4 LOAD/EJECT button: lets the tray slide out and in. This button is not available while the printer is in operation indicating "Busy" on the LCD. 5 SELECT button: rotates the function through the following: 1 Data Clear: clears all image data read from the PC. 2 Unlock Door: unlocks the side door. 3 Ink Remain: shows the ink ribbon's and the re-transfer ribbon's remaining amounts. 4 Printed No.: shows the total amount of discs printed on so far. When the indication exceeds 10,000, this is a time to replace the thermal print head (and the halogen lamp), so contact our customer service representative. 5 Test Print: runs the printer in test print mode. When "Test Print" is selected and you press the ENTER button, the display reads "Set Up Disc" and the tray slides out. Then you can put one of the supplied blank disc (CD-R) on the tray and press the ENTER button again. The tray will slide in and the printing process will start. For how to set up a medium on the tray, refer to SECTION 13 : Loading Print Media. 6 Interface: When the disc tray slides out and you press the ENTER button, the tray slides in and the P-55 switches back into the Ready mode. displays the port selected: USB or parallel port. (preset to USB) 6 ENTER button: initiates a function selected with the SELECT button. After a function is completed, you can wait for several seconds or press the ENTER button again to get back to "Ready." NOTE The SELECT button is not available while the printer is in operation indicating Busy on the LCD. 17
-
 1
1 -
2
-
3
-
4
-
5
-
6
-
7
-
8
-
9
-
10
-
11
-
 12
12 -
 13
13 -
 14
14 -
 15
15 -
 16
16 -
 17
17 -
 18
18 -
 19
19 -
 20
20 -
 21
21 -
 22
22 -
23
-
24
-
25
-
26
-
27
-
28
-
29
-
30
-
31
-
32
-
33
-
34
-
35
-
36
-
37
-
38
-
39
-
40
-
41
-
42
-
43
-
44
-
45
-
46
-
47
-
48
-
49
-
50
-
51
-
52
-
53
-
54
-
55
-
56
-
57
-
58
 |
 |
