TP-Link Archer T2UHP Archer T2UHPUN V1 User Guide - Page 15
WPS (Wi-Fi Protected Setup), Option 1
 |
View all TP-Link Archer T2UHP manuals
Add to My Manuals
Save this manual to your list of manuals |
Page 15 highlights
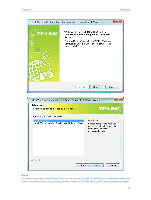
Chapter 3 Windows 3. 2. 3. WPS (Wi-Fi Protected Setup) WPS can be activated via PBC (Push Button Configuration) and PIN code. Please refer to PBCor PIN below. • PBC Option 1 1. Press the WPS/QSS button on your router or AP. Within 2 minutes, press and hold the WPS button on the adapter until the following screen appears. 2. The following screen indicates a successful connection by WPS. Click OK. 13
-
 1
1 -
2
-
3
-
4
-
5
-
6
-
7
-
8
-
9
-
 10
10 -
 11
11 -
 12
12 -
 13
13 -
 14
14 -
 15
15 -
 16
16 -
 17
17 -
 18
18 -
 19
19 -
 20
20 -
21
-
22
-
23
-
24
-
25
-
26
-
27
-
28
-
29
-
30
-
31
-
32
-
33
-
34
-
35
-
36
-
37
-
38
-
39
-
40
-
41
-
42
-
43
-
44
-
45
-
46
-
47
-
48
-
49
-
50
-
51
 |
 |

13
Chapter 3
Windows
3° 2° 3°
WPS (Wi-Fi Protected Setup)
WPS can be activated via PBC (Push Button Configuration) and PIN code. Please refer
to
PBC
or
PIN
below.
•
PBC
Option 1
1. Press the
WPS/QSS
button on your router or AP. Within 2 minutes, press and hold the
WPS
button on the adapter until the following screen appears.
2. The following screen indicates a successful connection by WPS. Click
OK
.