TP-Link EAP330 EAP330 V1 Quick Install Guide - Page 2
Option 1: Ceiling Rail Mounting, Option 3, Wall Mounting, Option 2: Ceiling Mounting
 |
View all TP-Link EAP330 manuals
Add to My Manuals
Save this manual to your list of manuals |
Page 2 highlights
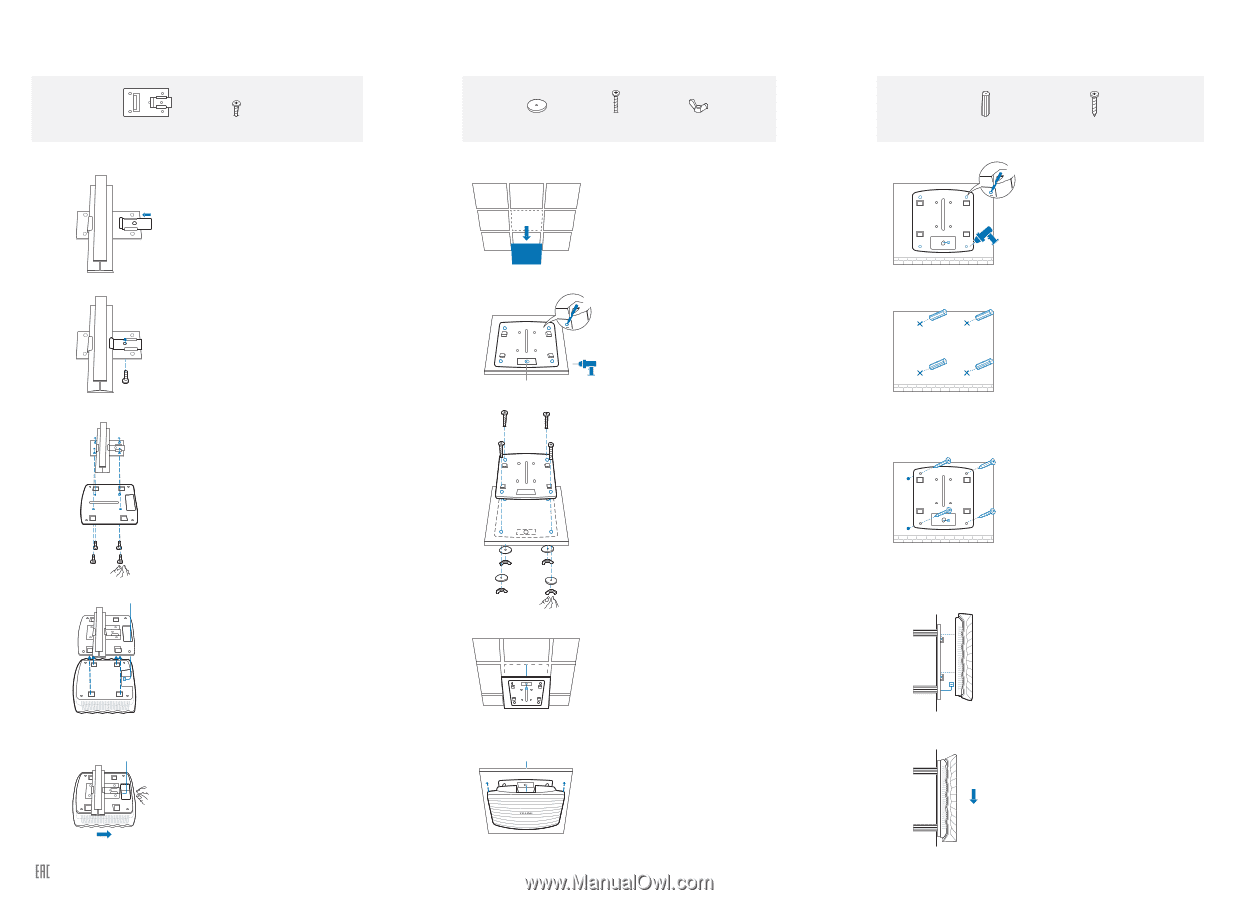
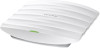
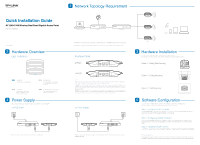
Option 1: Ceiling Rail Mounting Ceiling T-rail Clip M3×6 Pan-head Screws (Qty.5) 1 Position the Ceiling T-rail Clip and push the movable part toward the rail base. 2 Use an M3×6 pan-head screw to secure the T-rail Clip onto the ceiling rail. 3 Attach the mounting bracket to the Ceiling T-rail Clip using four M3x6 pan-head screws. Option 2: Ceiling Mounting Washers (Qty.4) M3×30 Pan-head Screws (Qty.4) Wing Nuts (Qty.4) 1 Remove the ceiling tile. X4 Hole for Ethernet cable 2 Place the mounting bracket in the center of the ceiling tile. Mark the four positions of the screw holes and a hole for the Ethernet cable to feed through. Drill four 4mm holes for the screws and a 10mm hole for the Ethernet cable. 3 Secure the mounting bracket to the ceiling tile using four M3x30 pan-head screws, washers and wing nuts. Option 3: Wall Mounting Note: We do not recommend you to install the EAP with the Ethernet port upward. M3×28 Plastic Wall Anchors (Qty.4) M3×20 Self-tapping Screws (Qty.4) X4 1 If your Ethernet cable feeds through the wall, you can position the mounting bracket to make the cable through the fixing hole. Mark the four positions of the screw holes and then drill four 6mm holes. 2 Insert the plastic wall anchors into the 6mm holes. 3 Secure the mounting bracket to the wall by driving the self-tapping screws into the anchors. Make sure that the shoulders of the mounting bracket are on the outside. 4 Make the Ethernet Cable pass through the fixing hole of the mounting bracket. Connect the cable to the ETHERNET port and attach the EAP to the bracket. 5 Push the EAP along the direction of arrows until it locks into place, as shown on the left. Then adjust the cable to make the exposed part hidden behind the EAP. Website: http://www.tp-link.com Tel: +86 755 26504400 E-mail: [email protected] 4 Feed the Ethernet cable through the hole. Then set the ceiling tile back into place. 5 Connect the Ethernet cable to the ETHERNET port and push the EAP along the direction of arrows until it locks into place, as shown on the left. Then adjust the cable to make the exposed part hidden behind the EAP. 4 Connect the Ethernet cable to the ETHERNET port on the EAP and attach the EAP to the mounting bracket, as shown on the left. 5 Push the EAP along the direction of arrows until it locks into place, and then adjust the cable to make the exposed part hidden behind the EAP. Copyright © 2016 TP-LINK
-
 1
1 -
 2
2
 |
 |