TP-Link RE210 RE210(EU) V1 QIG - Page 1
TP-Link RE210 Manual
 |
View all TP-Link RE210 manuals
Add to My Manuals
Save this manual to your list of manuals |
Page 1 highlights
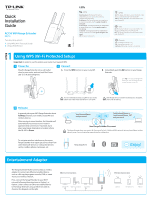
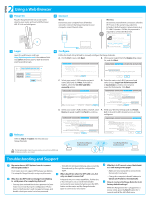
Quick Installation Guide AC750 WiFi Range Extender RE210 Two easy setup options: 1: Using WPS (Wi-Fi Protected Setup) 2: Using a Web Browser Reset LED LEDs (WPS) Flashing green: The Range Extender is establishing a secure connection or being con gured via web page. Solid green: The Range Extender has established a secure connection, and the signal strength is adequate. Solid orange: The Range Extender has established a secure connection, but the signal strength is too strong. Solid red: The Range Extender has established a secure connection, but the signal strength is too weak. O : No active connection. (2.4G) On: The Range Extender is connected to the 2.4G wireless network of your main Router/AP. O : The Range Extender isn't connected to your main Router/AP. (5G) On: The Range Extender is connected to the 5G wireless network of your main Router/AP. O : The Range Extender isn't connected to your main Router/AP. (Power) On: The Range Extender is on. O : The Range Extender is o . Flashing: The Range Extender is initializing. 7106504989 REV1.0.0 OPTION 1 Using WPS (Wi-Fi Protected Setup) Important: In order to use this option, your router must support WPS. 1 Power On 2 Connect Plug the Range Extender into a wall outlet close to your router, and wait until the Power LED is lit and solid green. A. Press the WPS button on your router/AP. B. Immediately push the RE button on your Range Extender. The " " LED should change from ashing to solid, showing that WPS connection was successful. Power RE RE Power Power RE 3 Relocate In general, place your WiFi Range Extender about halfway between your wireless router/AP and wireless devices. After moving to a new location, the Extender will automatically reconnect to your router in approximately one minute. If possible, try to place your Range Extender in a location where the LED is Green. To minimize wireless interference, place your Range Extender in an open space area, away from other bluetooth devices or radioactive devices such as cordless phone, microwave, etc. For more information about using WPS on your router, please refer to the router manufacturer's user guide. If the RE LED does not switch from blinking to a solid green, please refer to Option 2. YourNetworkName and password 5G 2.4G YourNetworkName or YourNetworkName_EXT and password Ideal Range Extender Placement The Range Extender shares your router's Wi-Fi password for both 2.4GHz and 5GHz networks, but may have di erent wireless network names if you customize the names during the con guration. Keep away from Enjoy! Entertainment Adapter The Range Extender RE210 can be used as a wireless adapter to connect any Ethernet-enabled device, such as a Blu-ray player, game console, DVR, or smart TV, to your wireless network. First, connect the Range Extender to your Wi-Fi network following the instructions in Option 1 or Option 2, then connect an Ethernet-enabled device to the Range Extender using an Ethernet cable as shown in the diagram on the right. Ethernet Connection Smart TV Game Console Desktop Wireless Connection Laptop Smartphone Tablet
-
 1
1 -
 2
2
 |
 |
