TP-Link RE210 RE210(EU) V1 QIG - Page 2
Troubleshooting and Support, Using a Web Browser - review
 |
View all TP-Link RE210 manuals
Add to My Manuals
Save this manual to your list of manuals |
Page 2 highlights
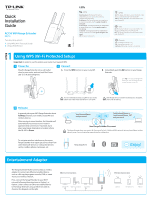
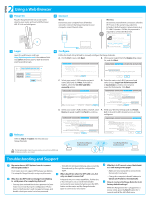
OPTION Power RE 2 Using a Web Browser 1 Power On Plug the Range Extender into a wall outlet close to your router, and wait until the Power LED is lit and solid green. 2 Connect Wired: Disconnect your computer from all wireless networks. Connect the Range Extender to your computer via an Ethernet cable. Wireless: Disconnect your Ethernet connection. Click the Wi-Fi icon on the system tray, select the Extender's default wireless network name (e.g. TP-LINK_Extender_XXGHz). No password is required to connect the rst time. or Not connected Connection are available Wireless Network Connection TP-LINK_Extender_XXGHz √ Connect automatically Connect 3 Login Launch a web browser and type http://tplinkrepeater.net in the address eld. Use admin (all lowercase) for both Username and Password to login. http://tplinkrepeater.net Username: Password: admin admin Login Cancel 4 Con gure Follow the Quick Setup Wizard to manually con gure the Range Extender. A. On the Start screen, click Next. B. Choose your region from the Region drop-down list, and click Next. Start Choose Region Wireless Settings Review Settings Main Router/AP Network Status: WiFi Network Name_2.4GHz: WiFi Network Name_5GHz: Connection Status: N/A N/A Disconnected Please click Next to set up the Range Extender or click Exit to manually con gure the device by yourself. Start Choose Region Wireless Settings Review Settings Region: Please Select Your Region Please select your own region to prevent illegal usage against the local law. Exit Next C. Select your router's 2.4G wireless network name (SSID) and click Next. If the SSID is hidden, select the Set SSID and MAC manually option. Start Choose Region Wireless Settings Review Settings Available Wireless Networks (2.4GHz): 24 Choose SSID √ TP-LINK_2.4GHz_XXX TP-LINK_XXX Signal MAC Channel 00-0A-EB-74-06-06 1 0C-72-2C-B3-A5-2C 1 Security WPA-PSK WPA-PSK Set SSID and MAC Manually Back Rescan Next Exit Next D. Enter the main router's Wi-Fi password and either choose Copy from Main Router/AP or Customize to create a new network name for the Extender. Click Next. Start Choose Region Wireless Settings Review Settings Main Router/AP Network (2.4GHz) Main Router/AP WiFi Network Name(SSID): TP-LINK_2.4GHz_XXX Main Router/AP MAC Address(BSSID): 00-0A-EB-74-06-06 WiFi Security Option: Most Secure(WPA-PSK/WPA2-PSK) Fill in the WiFi Password of your Main 123456789 Router/AP: Range Extender Network (XXGHz) Range Extender WiFi Network Name(SSID): Copy from Main Router/AP TP-LINK_2.4GHz_XXX Customize TP-LINK_2.4GHz_XXX_EXT Back Next E. Select your router's 5GHz wireless network. Click F. Verify your Wireless Settings and click Finish. Next and repeat step D. Click Next to continue. Both 2.4G and 5G LEDs should turn on and stay solid green. 5 Relocate Start Choose Region Wireless Settings Review Settings Main Router/AP Network (5GHz) Main Router/AP WiFi Network Name(SSID): TP-LINK_5GHz_XXX Main Router/AP MAC Address(BSSID): 00-0A-EB-74-06-06 WiFi Security Option: Most Secure(WPA-PSK/WPA2-PSK) Fill in the WiFi Password of your Main 123456789 Router/AP: Range Extender Network (XXGHz) Range Extender WiFi Network Name(SSID): Copy from Main Router/AP TP-LINK_5GHz_XXX Customize TP-LINK_5GHz_XXX_EXT Back Next Start Choose Region Wireless Settings Review Settings Wireless Setting Main Router/AP WiFi Network Name (2.4GHz): Main Router/AP WiFi Network Name (5GHz): Range Extender WiFi Network Name (2.4GHz): WiFi Security Option: WiFi Password: Range Extender WiFi Network Name (5GHz): WiFi Security Option: WiFi Password: TP-LINK_2.4GHz_XXX TP-LINK_5GHz_XXX TP-LINK_2.4GHz_XXX_EXT Most Secure (WPA/WPA2-PSK) 123456789 TP-LINK_5GHz_XXX_EXT Most Secure (WPA/WPA2-PSK) 123456789 Export Settings Back Finish Refer to Step 3 of Option 1 to relocate your Range Extender. The Range Extender shares the same wireless network name (SSID) and wireless password as your router. YourNetworkName and password 5G 2.4G YourNetworkName and password Troubleshooting and Support 1 My router has no WPS button, how do i connect the Range Extender? Your router does not support WPS, please use Option 2 to setup the Range Extender using a web browser. 2 Why does the WPS LED not change from blinking to solid green after completing Option 2? • You may have entered the wireless password of your router incorrectly during the con guration. Please login to the Extender's web management page, and double-check your router's wireless password. • If the RE LED still keeps blinking, please reset the Extender and go through the con guration again. 3 What should I do when the WPS LED is on, but only one band is connected? It depends on your router capabilities, if either the 2.4G or 5G LED is not on while the Extender connected to your router/network, press the WPS button on the router and the Range Extender again to connect the other band. 4 What do I do if I cannot access the Extender's web management page? • Make sure your computer is connected to the Extender's network. • Change the computer's xed IP address to Obtain an IP Address Automatically. 5 How do I restore the Range Extender to its factory default settings? While the Range Extender is plugged into a power outlet, press the Reset button for 5 seconds until all the LEDs ash once.
-
 1
1 -
 2
2
 |
 |