TP-Link RE590T RE590TUN V1 Quick Install Guide - Page 1
TP-Link RE590T Manual
 |
View all TP-Link RE590T manuals
Add to My Manuals
Save this manual to your list of manuals |
Page 1 highlights
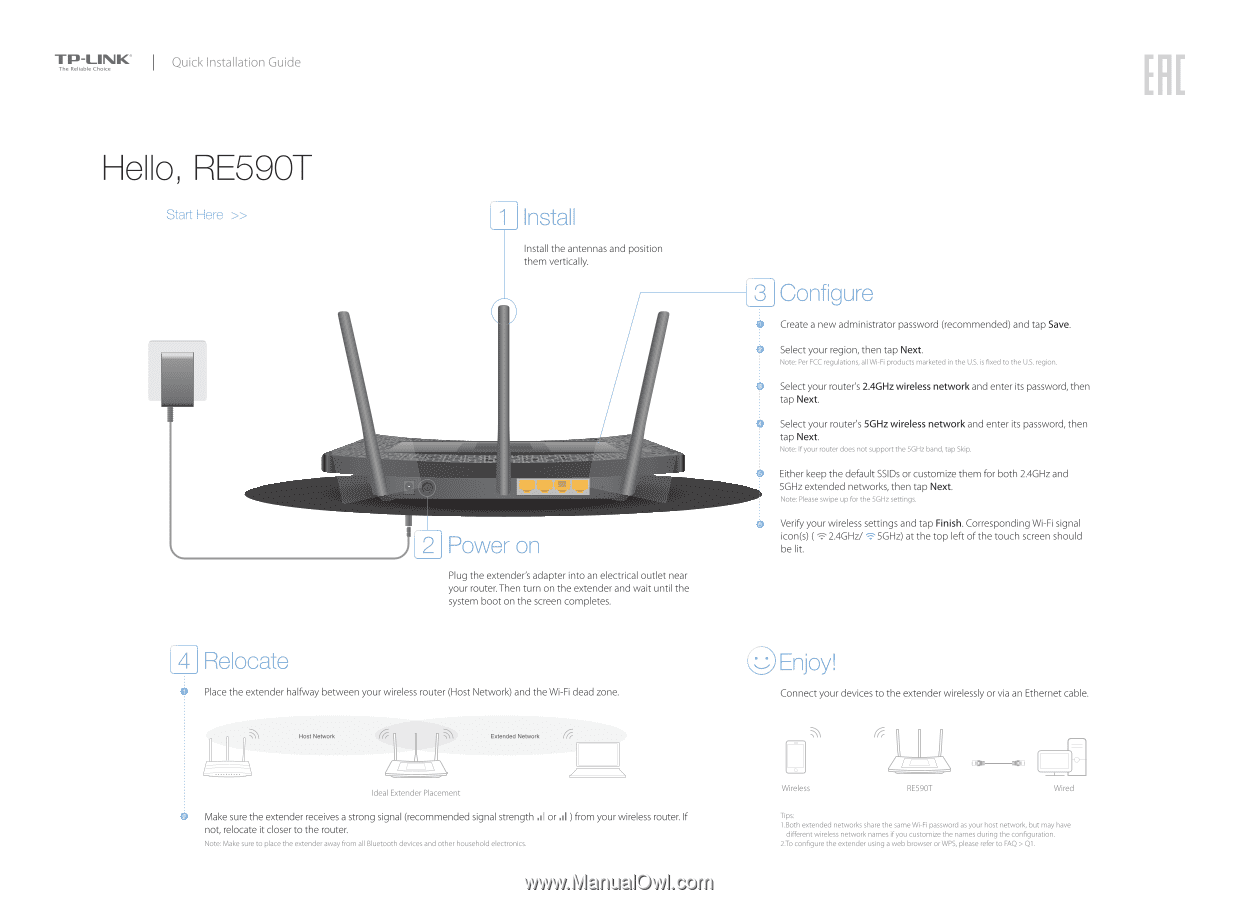
TP-LINIC I Quick Installation Guide The Reliable Choice ERE Hello, RE590T Start Here » Install the antennas and position them vertically. IIIIIIII IIIIIIII IIIIIIII IIIIIIII 2J Power on Plug the extender's adapter into an electrical outlet near your router. Then turn on the extender and wait until the system boot on the screen completes. 4 I Relocate Place the extender halfway between your wireless router (Host Network) and the Wi-Fi dead zone. Host Network Extended Network ( Ideal Extender Placement Make sure the extender receives a strong signal (recommended signal strength .1 or not, relocate it closer to the router. Note: Make sure to place the extender away from all Bluetooth devices and other household electronics. ) from your wireless router. If [3 Configure 0 Create a new administrator password (recommended) and tap Save. (. Select your region, then tap Next. Note: Per FCC regulations, all Wi-Fi products marketed in the U.S. is fixed to the U.S. region. Select your router's 2.4GHz wireless network and enter its password, then tap Next. t Select your router's 5GHz wireless network and enter its password, then tap Next. Note: If your router does not support the 5GHz band, tap Skip. Either keep the default SSIDs or customize them for both 2.4GHz and 5GHz extended networks, then tap Next. Note: Please swipe up for the 5GHz settings. Verify your wireless settings and tap Finish. Corresponding Wi-Fi signal icon(s) ( 2.4GHz/ 5GHz) at the top left of the touch screen should be lit. Connect your devices to the extender wirelessly or via an Ethernet cable. 0 Wireless RE590T -O- Wired Tips: 1.Both extended networks share the same Wi-Fi password as your host network, but may have different wireless network names if you customize the names during the configuration. 2.To configure the extender using a web browser or WPS, please refer to FAQ > Q1.
-
 1
1 -
 2
2
 |
 |