TP-Link TD-VG5612 TD-VG5612 V1 Quick Install Guide - Page 1
TP-Link TD-VG5612 Manual
 |
View all TP-Link TD-VG5612 manuals
Add to My Manuals
Save this manual to your list of manuals |
Page 1 highlights
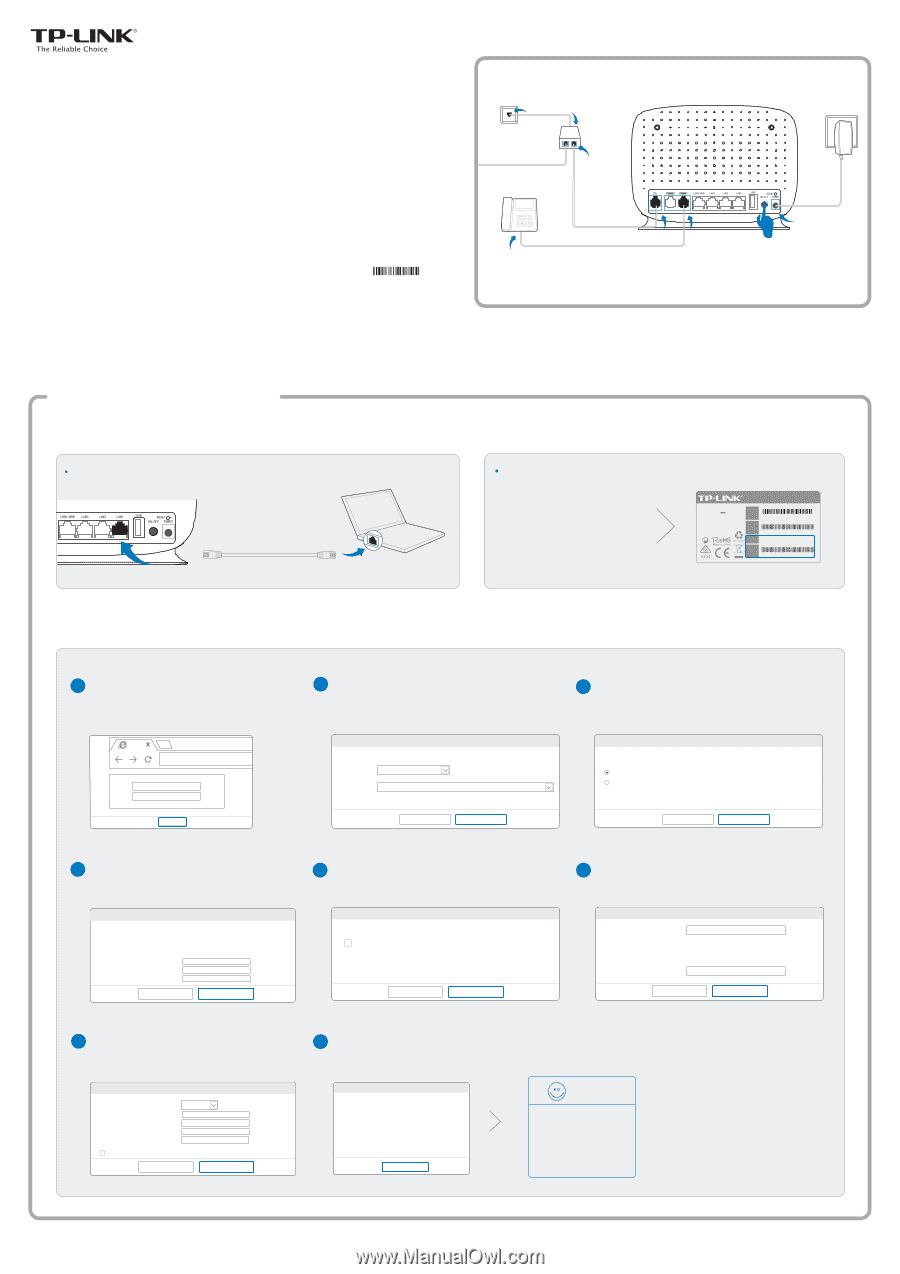
Quick Installation Guide 300Mbps Wireless N VoIP VDSL/ADSL Modem Router TD-VG5612 7106505825 REV1.0.1 1. Connecting the Hardware 1 Connect the splitter and power adapter as follows. Then press the POWER ON/OFF button. Phone Jack LINE PHONE For traditional phone service Splitter MODEM For VoIP service 2 Please wait for 1 - 2 minutes till Power and DSL LEDs are on, then continue to configure the modem router. 2. Configuring the Modem Router Method 1 Via Web Browser 1 Connect your computer to the modem router (Wired or Wireless). Wired Ethernet cable Wireless Or Connect wirelessly by using the default network name (SSID) and password on the product label printed on the bottom of the modem router. Model: TD-VG5612 Power: 12V 1.5A Default Access: http://tplinkmodem.net Username: admin Password: admin 300Mbps Wireless N VoIP VDSL/ADSL Modem Router Serial Number XXXXXXXXXXXXX MAC Address XX-XX-XX-XX-XX-XX SSID TP-LINK_XXXXXX Wireless Password /PIN XXXXXXXX V1.0 2 Open a web browser on the computer and configure the modem router according to the following main clues. a Enter http://tplinkmodem.net or http://192.168.1.1 in the address bar. Type in admin for both the username and password and click Login. Note: If the login window does not appear, please refer to FAQ->Q1. http://tplinkmodem.net admin admin Login b Choose Quick Setup in the main menu and then click Next to start the configuration. Select your Region and Time Zone from the drop-down list, and then click Next. Note: Per FCC regulations, all Wi-Fi products marketed in the U.S. must be fixed to the U.S. region only. Quick Setup-Region and Time Zone Region United Kingdom Time Zone (GMT) Greenwich Mean Time; Dublin, Edinburgh, London, Lisbon Back Next c Select Yes to auto detect your connection type and then click Next to continue. Quick Setup-Auto Detection Auto-Detect Connection Type: Yes. No. I want to configure the Internet connection myself. Back Next d Enter the parameters provided by your ISP and then click Next. Here we take PPPoE as an example. Quick Setup-PPPoE Auto-detection has succeeded! DSL PVC: 8/35 Encapsulation Mode: LLC Connection Type: PPPoE Username: XXXXXX Password: XXXXXX Confirm Password: XXXXXX Back Next e Click Next to continue. Note: You may enable 3G/4G as a backup method for Internet access. Quick Setup-3G/4G Enable 3G/4G as a backup solution for Internet access. Back Next f Click Next to continue. Note: You may rename your wireless network name and create your own password. Quick Setup-Wireless Wireless Network Name: Channel: Mode: Security: Password: TP-LINK_XXXXXX XXXXXXXX Back Next g Enter the Voice parameters provided by your ISP and then click Next. If needed, tick Advanced Setup to configure more. Quick Setup-Voice Locale Selection: GB-UK Phone Number/User ID: XXXXXX * Registrar Address: XXXXXX * Authentication ID: XXXXXX Password: XXXXXX Advanced Setup Back Next h Click Save and wait for your settings to take effect. Click Finish to complete the setup. Quick Setup-Complete Time Zone Configuring: Success Operation Mode Configuring: Success WAN Connection Releasing: Success WAN Connection Configuring: Success Gateway and DNS Configuring: Success 3G/4G Connection Configuring: Success Voice Configuring: Success Wireless Configuring: Success Finish Enjoy! Now your wired and wireless devices can connect to the Internet ! Note: If you have changed your wireless network name and password, you must sign in with the new names/passwords to regain access to the Internet.
-
 1
1 -
 2
2
 |
 |