TP-Link TD-W9970B TD-W9970BEU V1 Quick Install Guide - Page 1
TP-Link TD-W9970B Manual
 |
View all TP-Link TD-W9970B manuals
Add to My Manuals
Save this manual to your list of manuals |
Page 1 highlights
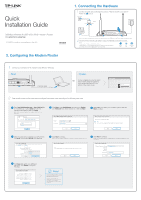
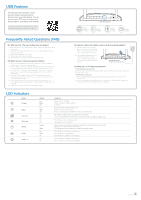
Quick Installation Guide 300Mbps Wireless N USB VDSL/ADSL Modem Router TD-W9970/TD-W9970B *TD-W9970 is used for demonstration in this QIG. 7106506058 REV2.0.0 2. Configuring the Modem Router 1. Connecting the Hardware 1 Connect the splitter and power adapter as follows. Press the ON/OFF button and the Power LED turns on. Phone Jack Splitter VDSL LAN4/WAN LAN3 LAN2 LAN1 USB WiFi WPS/ RESET ON/OFF POWER Note: If you don't need the phone service, just directly connect the VDSL port to the Phone Jack with a phone cable. 2 Check the Power and DSL LED lights to ensure the hardware connection is correct. Notes: Please wait 1-2 minutes until the DSL LED is on. If the Wireless LED is off, please press the WiFi button on the rear panel for 2 seconds, then check the LEDs again in a few seconds. Power DSL On On Wireless On 1 Connect your computer to the modem router (Wired or Wireless). Wired VDSL LAN4/WAN LAN3 LAN2 LAN1 USB WiFi WPS/ RESET ON/OFF POWER Ethernet cable Wireless Or Connect wirelessly by using the default network name (SSID) and password on the product label printed on the bottom of the modem router. 2 Open a web browser on the computer and configure the modem router according to the following main clues. a Enter http://tplinkmodem.net or http://192.168.1.1 in the address bar. Type in admin for both the username and password and click Login. Note: If the login window does not appear, please refer to FAQ->Q1. http://tplinkmodem.net admin admin Login b Click Next to start Quick Setup, and select your Region and Time Zone from the drop-down list. Then click Next. Quick Setup-Region and Time Zone Region --please select-- Time Zone --please select-- Back Next c Select Yes to auto detect your connection type and then click Next to continue. Quick Setup-Auto Detection Auto-Detect Connection Type: Yes. No. I want to configure The Internet Connection myself. Back Next d Enter the parameters provided by your ISP and then click Next. Here we take PPPoE as an example. Quick Setup-PPPoE Auto-detection has succeeded! DSL PVC: 8/35 Encapsulation Mode: LLC Connection Type: PPPoE User name: XXXXXX Password: XXXXXX Confirm Password: XXXXXX Back Next e Click Next to continue. Note: You may enable 3G/4G as a backup method for Internet access. Quick Setup-3G/4G Enable 3G/4G as a backup solution for Internet access. Back Next f Click Next to continue. Note: You may rename your wireless network name and create your own password. Quick Setup-Wireless Wireless Network Name: Channel: Mode: Security: Password: TP-LINK_XXXX XXXXXXXX Back Next g Click Save and wait for your settings to take effect. Click Finish to complete the setup. Quick Setup-Complete Time Zone Configuring: Success Operation Mode Configuring: Success WAN Connection Configuring: Success 3G/4G Connection Configuring: Success Gateway and DNS Configuring: Success Wireless Configuring: Success Finish Enjoy! Now your wired and wireless devices can connect to the Internet ! Note: If you have changed your wireless network name and password, you must sign in with the new names/passwords to regain access to the Internet.
-
 1
1 -
 2
2
 |
 |