Appendix: Configure the Camera via IP Search
Software Installation
4
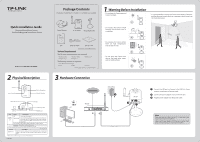
1
2
3
4
Access the Camera Using IP Search
5
1
2
3
4
Live video will display in the center of your web browser.
www.tp-link.com
TP-LINK TECHNOLOGIES CO., LTD.
Note:
If the information bar does not show up, please refer to
Troubleshooting
.
Click the icon of
IP Search
on the computer’s Desktop.
Click “
SEARCH
”, the main page will show up and list all
active TP-LINK camera devices. Select the camera based
on its MAC address, which can be found on its label.
When you are accessing the Camera for the first time, a yellow
information bar will appear at the bottom of the web page.
Click the “
Install
”
button
.
Then click “
Install
” at the prompt.
Troubleshooting
* If the CD does not automatically run with the installation window
appearing, find the CD drive in the “
My Computer
” space and run it
directly there.
For advanced settings, please refer to the
User Guide
on the
Resource CD.
1
What can I do if the information bar does not show up?
Open an IE browser. Click “
Tools
”, then “
Internet options
”.
Click “
Security
” -> “
Internet
” -> “
Custom level...
”. Find the
item “
Download signed ActiveX controls
” and set to
“
Prompt (recommended)
”, then click “
OK
”. Click “
Security
” ->
“
Local
intranet
”
-> “
Custom
level...
”.
Find
the
item
“
Download signed ActiveX controls
” and set to “
Prompt
”,
then click “
OK
”.
2
What can I do if I forget the login name and password?
Keep the camera powered on, then press and hold the
Reset
button for more than 5 seconds. Afterwards release it, and the
camera will be restored to factory defaults after reboot. Both
the default name and password are admin.
4
What can I do if the video image flickers?
Wrong power line frequency makes images flicker. Make sure
the power frequency of your camera is 50 or 60Hz. If the object
is dark, the image will flicker. Make the environment around
the camera brighter.
3
What can I do if I can’t access the Camera?
Make sure the Power LED is solid orange. If you can’t find the IP
address through IP Installer, please log into your router and
find the camera’s IP address in the DHCP Client list. If this still
doesn’t work, please reset the camera.
For more details about Troubleshooting and Technical Support
contact, please log onto our Technical Support Website.
The Setup Wizard will automatically pop up, then click “
IP
Search Software
”.
Click “
Finish
” to complete the setup and the icon of “
IP
Search
” will display on the computer’s Desktop.
Click “
Install
IP Search Software
”, and the IP Search
Software window will appear. Click “
Next
” to follow the
wizard steps to install the software .
Insert the provided Resource CD into your CD-ROM drive.
If you want to configure the parameters of the camera,
please click “
Setting
” on the web management page.
Enter
User
name
and
Password
to
log
onto
the
configuration page of the camera. (Default is
admin /
admin
)
Wireless Setting
LAN Setting
2
After taking the steps above, you will be prompted to
unplug the Ethernet cable to activate wireless access. And
you can select to test wireless settings or finish wireless
procedure in the following figure.
1
Select the camera you want to configure and click the
“
WIRELESS
”
button. Click SSID to select your wireless AP or
router and key in WEP or WPA key. Click “
>>
” to confirm
wireless setting and then submit your settings.
2
Change the login password. Tick the box and then key in a
new username and password, and click “
Submit
” button to
perform your settings accordingly. Click “
<<
” button to
return to the previous page.
1
Select the camera you want to configure and click the “
LAN
”
button. Modify the relative settings of the selected device.
Click “
<<
” button to quit the LAN setting procedure or click
“
>>
” button to move to next page.
With “
IP Search
”, you can change the IP related parameters of wired interface and connect the camera to the wireless network quickly. Wireless
setting is for TL-SC3230N only.
Double click the selected camera and you will link to this camera
by browser (or you can click “
VIEW
” to view the live video on the
right corner of the page) .
Note:
Surveillance Manager software is provided on the CD for
you to manage the camera. For detailed instruction,
please refer to its user manual included.
Technical Support
For all other technical support, please contact us by using the following details:
UK
Singapore
Global
Tel: +86 755 26504400
Service time: 24hrs, 7 days a week
Tel: +65 62840493
Service time: 24hrs, 7 days a week
Tel: +44 (0) 845 147 0017
Service time: 24hrs, 7days a week
Germany / Austria
Tel :+49 1805 875465 (German Service)
+49 1805 TPLINK
Fee: 0.14 EUR/min from the German
fixed phone network and up to 0.42
EUR/min from mobile phone.
Service Time: Monday to Friday, 9:00 AM
to 6:00 PM, GMT+1 or GMT+2
(Daylight Saving Time in Germany)
* Except bank holidays in Hesse
USA / Canada
Toll Free: +1 866 225 8139
Service time: 24hrs, 7days a week
Malaysia
Tel: 1300 88 875465 (1300 88TPLINK)
Service time: 24hrs, 7days a week
Russian Federation
Tel: 8 (499) 754-55-60
/
8 (800) 250-55-60
(toll-free call from any RF region)
Service time: From 10:00 to 18:00 (Moscow time)
*Except weekends and holidays in
Russian Federation
Tel: (+62 ) 021 6259 135
Service time:
Monday to Friday 9:00
-12:00 ; 13:00 -18:00
(Except public
holidays)
Switzerland
Tel: +41 (0)848 800998 (German Service)
Fee: 4-8 Rp/min, depending on rate of
different time
Service time: Monday to Friday 9:00 AM to
6:00 PM. GMT+ 1 or GMT+ 2 (Daylight Saving
Time)
Indonesia
Australia / New Zealand
Turkey
Tel: AU 1300 87 5465
NZ 0800 87 5465
Service time: 24hrs, 7 days a week
Tel: 444 19 25
(
Turkish Service
)
NZ 0800 87 5465
Service time: 9:00 AM to 6:00 PM, 7days a week
Italy
Tel:
+39 0230519020
Service time: Monday to Friday,
9:00 AM to 6:00 PM, 2:00 PM to 6:00 PM
Ukraine
Tel: 0-800-505-508
Service time: Monday to Friday
14:00 PM to 22:00 PM
Toll Free: 0800-770-4337
(Portuguese Service)
Service time: Monday to Saturday
08:00 AM to 08:00 PM
Brazil
Poland
Tel: +48 (0) 801 080 618 / +48 22 7217563
(if calls from mobile phone)
Service time: Monday to Friday 9:00 AM to 5:00
PM. GMT+1 or GMT+2 (Daylight Saving Time)
For more troubleshooting help, go to
www.tp-link.com/en/support/faq
To download the latest Firmware, Driver, Utility and User Guide, go to
France
Tel: +33 (0) 820 800 860 (French service)
Email: support.fr @tp-link.com
Fee: 0.118 EUR/min from France
Service time: Monday to Friday 9:00 AM to
6:00 PM (Except French Bank holidays)
 1
1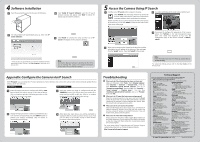 2
2