TP-Link TL-WDN4800 User Guide - Page 26
Auto Profile Selection Management
 |
View all TP-Link TL-WDN4800 manuals
Add to My Manuals
Save this manual to your list of manuals |
Page 26 highlights
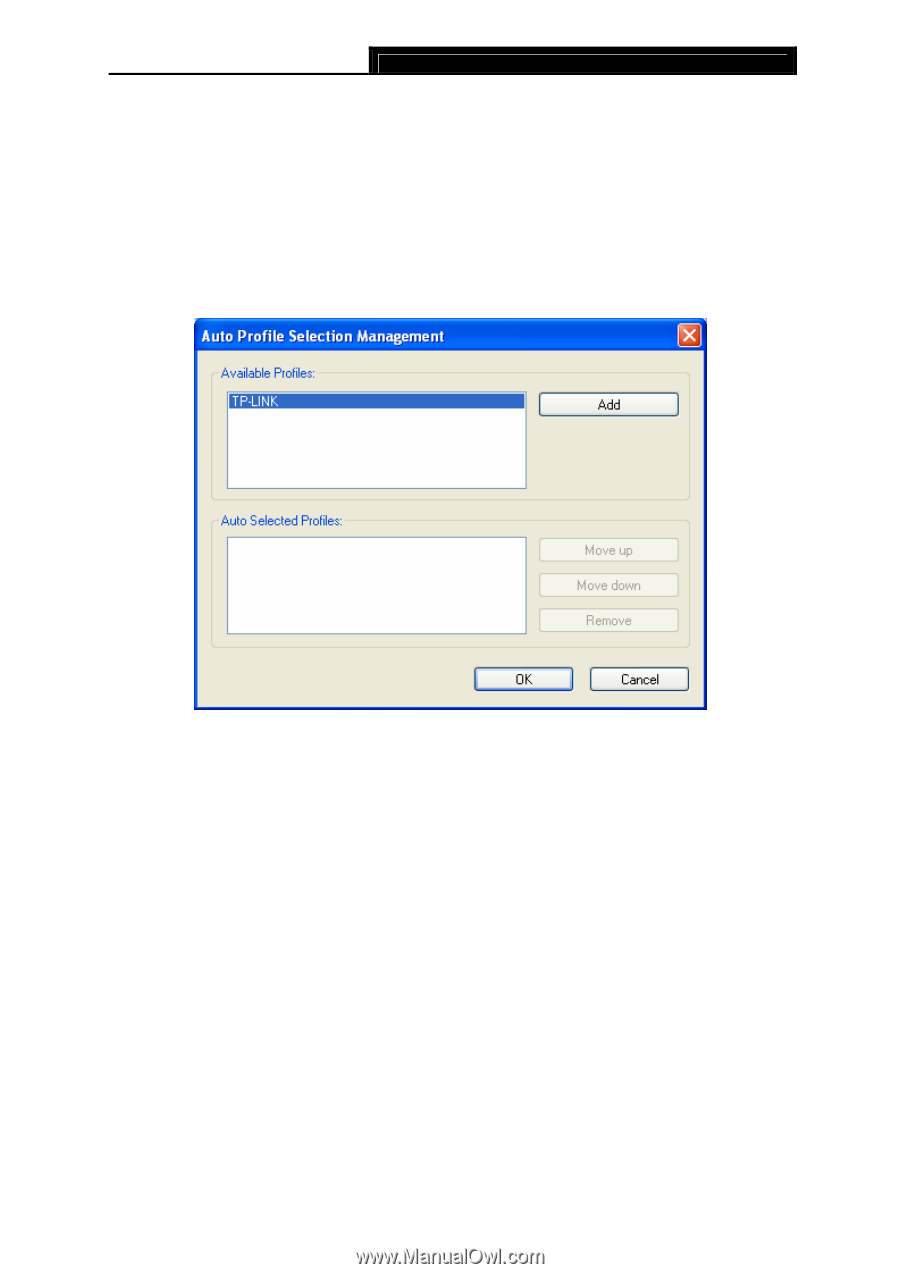
TL-WDN4800 450Mbps Wireless N Dual Band PCI Express Adapter 3.1.2.7. Auto Profile Selection Management The auto selection feature allows the adapter to automatically select a profile from the list of profiles and use it to connect to the network. To add a new profile into the Auto Selected Profiles list, please follow these steps. 1. On the Profile Management screen (shown in Figure 3-2), click Order Profiles.... X 2. The Auto Profiles Selection management window will appear (shown in Figure 3-11) with a list of all created profiles in the Available Profiles. Figure 3-11 3. Highlight the profiles to add to auto profile selection, and click Add. The profile will appear in the Auto Selected Profiles box. 4. Highlight a profile in the Auto Selected Profiles box. 5. Click Move Up or Move Down as appropriate. ) Note: The first profile in the Auto Selected Profiles box has highest priority, while the last profile has the lowest priority. 6. Click OK. 7. Check the Auto Select Profiles checkbox on the Profile Management tab (shown in Figure 3-2). ) Note: When auto profile selection is enabled by checking Auto Select Profiles on the Profile Management tab, the client adapter will scan for an available network. The profile with the highest priority and the same SSID as one of the found networks will be used to connect to the 20
-
 1
1 -
2
-
3
-
4
-
5
-
6
-
7
-
8
-
9
-
10
-
11
-
12
-
13
-
14
-
15
-
16
-
17
-
18
-
19
-
20
-
 21
21 -
 22
22 -
 23
23 -
 24
24 -
 25
25 -
 26
26 -
 27
27 -
 28
28 -
 29
29 -
 30
30 -
 31
31 -
32
-
33
-
34
-
35
-
36
-
37
-
38
-
39
-
40
-
41
 |
 |