TRENDnet TEW-651BR User Guide - Page 55
DMZ
 |
UPC - 710931600681
View all TRENDnet TEW-651BR manuals
Add to My Manuals
Save this manual to your list of manuals |
Page 55 highlights
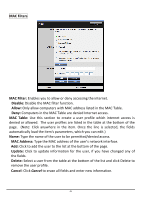
Incoming: Defines which incoming communications users are permitted to connect with. z Protocol: Select the protocol (TCP, UDP, or * for TCP+UDP) that can be used by the incoming communication. z Port: Type the port number that can be used for the incoming communication. z Add: Click to add the special application profile to the table at the bottom of the screen. z Update: Click to update information for the special application if user have selected a list item and have made changes. z Delete: Select a list item and click Delete to remove the item from the list. z Cancel: Click Cancel button to erase all fields and enter new information. DMZ This screen enables users to create a DMZ for those computers that cannot access Internet applications properly through the WLAN Router and associated security settings. Note: Any clients added to the DMZ exposes the clients to security risks such as viruses and unauthorized access. Enable: Click to enable or disable the DMZ. DMZ Host IP: Type a host IP address for the DMZ. The computer with this IP address acts as a DMZ host with unlimited Internet access. Apply: Click to save the settings. 50
-
 1
1 -
2
-
3
-
4
-
5
-
6
-
7
-
8
-
9
-
10
-
11
-
12
-
13
-
14
-
15
-
16
-
17
-
18
-
19
-
20
-
21
-
22
-
23
-
24
-
25
-
26
-
27
-
28
-
29
-
30
-
31
-
32
-
33
-
34
-
35
-
36
-
37
-
38
-
39
-
40
-
41
-
42
-
43
-
44
-
45
-
46
-
47
-
48
-
49
-
 50
50 -
 51
51 -
 52
52 -
 53
53 -
 54
54 -
 55
55 -
 56
56 -
 57
57 -
 58
58 -
 59
59 -
 60
60 -
61
-
62
-
63
-
64
-
65
 |
 |
