TRENDnet TV-IP672PI Quick Installation Guide - Page 3
Hardware Installation and Configuration
 |
View all TRENDnet TV-IP672PI manuals
Add to My Manuals
Save this manual to your list of manuals |
Page 3 highlights
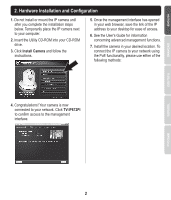
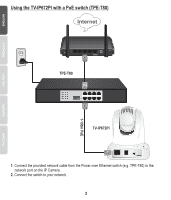
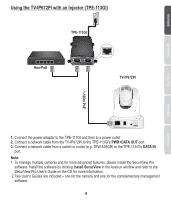
2. Hardware Installation and Configuration 1. Do not install or mount the IP camera until after you complete the installation steps below. Temporarily place the IP camera next to your computer. 2. Insert the Utility CD-ROM into your CD-ROM drive. 3. Click Install Camera and follow the instructions. 5. Once the management interface has opened in your web browser, save the link of the IP address to your desktop for ease of access. 6. See the User's Guide for information concerning advanced management functions. 7. Install the camera in your desired location. To connect the IP camera to your network using the PoE functionality, please use either of the following methods: 4. Congratulations! Your camera is now connected to your network. Click TV-IP672PI to confirm access to the management interface. 2
-
 1
1 -
 2
2 -
 3
3 -
 4
4 -
 5
5 -
 6
6 -
 7
7 -
 8
8 -
 9
9
 |
 |