Thermador MEDMCW31WS Installation Instructions - Page 1
Thermador MEDMCW31WS Manual
 |
View all Thermador MEDMCW31WS manuals
Add to My Manuals
Save this manual to your list of manuals |
Page 1 highlights
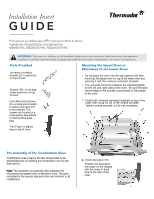
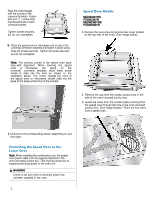
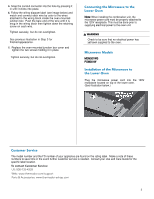
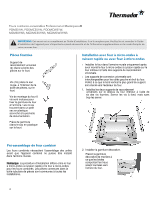
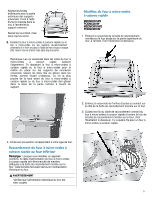
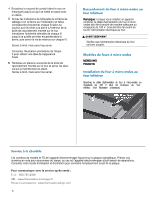
Installation Insert GUIDE Professional and Masterpiece® Combination Built In Ovens POM301W, PODMC301W, PODMCW31W, MEM301WS, MEDMC301WS, MEDMCW31WS 9 IMPORTANT: This insert is in addition to the Installation Guide and is not a substitute. Read and consult the appliance Installation Guide for important safety messages and additional information regarding the use of your new appliance. Parts Provided Universal connector bracket (2)--in parts box on top of oven Screws (16)--in red bag inside parts box on top of oven. Oven Mounting Screws (8)--screws are included to secure the oven trim to the cabinet. The screws are located in a small plastic bag affixed to the literature pack bag. Mounting the Speed Oven or Microwave to the Lower Oven • Do not place the oven into the wall cabinet until after mounting the speed oven on top of the lower oven and securing it with the universal connector brackets. • The universal connector brackets are interchangeable for the left and right sides of the oven. Be sure the taller vertical edge of the bracket is positioned to the outside of the oven. 1. Install both universal connector brackets on top of the lower oven using six (6) of the screws provided. Tighten screws securely, but do not overtighten. Trim Piece--in plastic bag on top of oven. Pre-Assembly of the Combination Oven Combination ovens require the two components to be assembled prior to installing the combination unit into the wall cabinet. Note: The installation procedures differ between the microwave and speed oven combination units. The parts contained in the square tube parts box are common to all installations. 2. Install decorative trim. Position the decorative trim piece so the flanges with the holes in them face to the rear of the oven.
-
 1
1 -
 2
2 -
 3
3 -
 4
4 -
 5
5 -
 6
6 -
 7
7 -
8
-
9
-
10
-
11
-
12
 |
 |