Thermador PCG305W Instructions for Use - Page 24
Electric grill
 |
View all Thermador PCG305W manuals
Add to My Manuals
Save this manual to your list of manuals |
Page 24 highlights
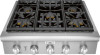
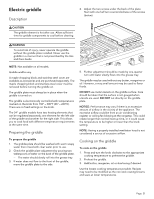
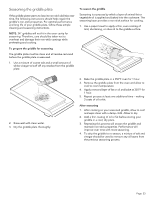
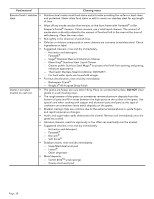
Electric grill Assembling the grill Description 9 WARNING • To avoid risk of injury, NEVER operate grill without the grates or griddle plate accessory installed. • NEVER leave grill unattended while cooking. • Observe caution with oils and fats. Overheated oils and fats can easily cause fires. • DO NOT use wood chips, lava rocks, or charcoal briquettes. Only use recommended ceramic briquettes (PABRICKBKN). • DO NOT use dishes, pans, pots, or other cookware on the grill. • NEVER use aluminum foil to cover the grates or to line the grill. It can damage the grill and cause a fire hazard if heat is trapped under it. • Check drip tray before each use. Too much grease in the tray may cause a fire hazard. • If flames appear, grease should be cleaned from grates, drip tray, briquette basket and other surfaces. • Grease build up encourages flame and smoke development while cooking. • Ceramic briquettes must be replaced when they begin to turn black. This means that they are saturated with fat and may smoke heavily during operation or the fat may catch fire. NOTE: Not available on all models. The built-in grill is made of restaurant-quality cast iron grates. This produces a surface with even heat that is easy to clean. A non-stick cast iron griddle plate is available as an accessory and may be purchased separately. See the instructions that come with the griddle plate accessory for more details. 6 4 3 2 5 1 1 Grill housing 2 Drip tray 3 Briquette basket 4 Ceramic briquettes 5 Heating element (x2) 6 Grill grate (x2) To assemble the grill 1. Rotate heating elements (5) up and remove the briquette basket (3) stored inside the grill housing (1). 2. Place the drip tray (2) in the bottom of the grill housing (1). (Drip tray is packaged in the large cardboard box that was on top of the appliance.) Align the embosses of the drip tray (2) with the depressions on the bottom of the grill housing (1). 3. Place the briquette basket (3) in the grill housing (1). 4. Arrange the ceramic briquettes (4) on the briquette basket (3), in a single layer. The ceramic briquettes should not contact the heating elements. Page. 24
-
 1
1 -
2
-
3
-
4
-
5
-
6
-
7
-
8
-
9
-
10
-
11
-
12
-
13
-
14
-
15
-
16
-
17
-
18
-
 19
19 -
 20
20 -
 21
21 -
 22
22 -
 23
23 -
 24
24 -
 25
25 -
 26
26 -
 27
27 -
 28
28 -
 29
29 -
30
-
31
-
32
-
33
-
34
-
35
-
36
-
37
-
38
-
39
-
40
-
41
-
42
-
43
-
44
-
45
-
46
-
47
-
48
-
49
-
50
-
51
-
52
-
53
-
54
-
55
-
56
-
57
-
58
-
59
-
60
-
61
-
62
-
63
-
64
-
65
-
66
-
67
-
68
-
69
-
70
-
71
-
72
-
73
-
74
-
75
-
76
-
77
-
78
-
79
-
80
-
81
-
82
-
83
-
84
-
85
-
86
-
87
-
88
-
89
-
90
-
91
-
92
-
93
-
94
-
95
-
96
 |
 |