Thermador PRG366GH Installation Instructions - Page 16
Step 8: Door Removal and, Reinstallation
 |
View all Thermador PRG366GH manuals
Add to My Manuals
Save this manual to your list of manuals |
Page 16 highlights
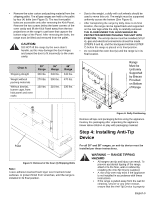
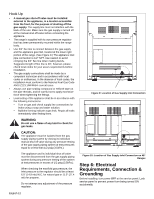
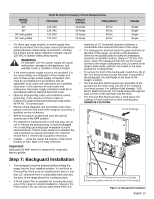
WARNING Fingers or hand could get pinched when installing the backguard. Severe injury could result. Use extreme caution and wear thick protective gloves to avoid potential cut or laceration to finger or hand while sliding the backguard down onto the range. WARNING To avoid possible burn or fire hazard, a backguard designed specifically for this range must be installed whenever the range is used. CAUTION The Pot and Pan Shelf can get very hot! DO NOT place the following items on top of the Pot and Pan Shelf: • plastics or containers that can melt • flammable items • a total load over 30 pounds (13.6kg) Range Width 30" 36" 48" Chart C: Backguard Kit Model Numbers 6" Std. Low Back 9" Low Back 22" Pot and Pan Shelf Included with Range N/A N/A N/A PA36GLBH PA48GLBH PA30GHSH PA36GHSH PA48GHSH Flush Island Trim PA30GITH Included with Range Included with Range Step 8: Door Removal and Reinstallation When the front of the door is high enough, you will be able to pull the door straight out. 5. Place the door in a safe and stable location. CAUTION USE CAUTION WHEN REMOVING THE DOOR. THE DOOR IS VERY HEAVY. • Make sure oven is cool and power to oven has been turned off before removing the door. Failure to do so could result in electrical shock or burns. • The oven door is heavy and fragile. Use both hands to remove or replace the door. • Grasp only the sides of the oven door when removing or replacing it. • Failure to grasp the oven door firmly and properly could result in personal injury and product damage. • With the door off, never release the levers and try to close the hinges. Without the weight of the door, the powerful springs will snap the hinges closed with great force. To Reinstall the Oven Door: 1. Hold door on both sides. Insert hinges into hinge slots. The door will be about halfway open. It may be necessary to press firmly inward on the lower portion of the door, using a rocking motion to fully seat the door's hinges. 2. Open door all the way to expose hinge clips. Push hinge clips away from you (toward the oven) until they meet the hinge. 3. Close and open the door slowly to test the installation. It should open and close smoothly and be straight, not crooked. To Remove the Oven Door: 1. Fully open the oven door. 2. Flip the hinge clip toward you (see illustration at right). 3. Close the door until it stops; the open hinge clip will hold the door about halfway open. 4. Grasp the door on the sides. The door is heavy and fragile - always use both hands. Lift the door up and out (there will be some spring resistance to overcome). Photo A: Hinge bracket in closed position English 14
-
 1
1 -
2
-
3
-
4
-
5
-
6
-
7
-
8
-
9
-
10
-
 11
11 -
 12
12 -
 13
13 -
 14
14 -
 15
15 -
 16
16 -
 17
17 -
 18
18 -
 19
19 -
 20
20 -
 21
21 -
22
-
23
-
24
-
25
-
26
-
27
-
28
-
29
-
30
-
31
-
32
-
33
-
34
-
35
-
36
-
37
-
38
-
39
-
40
-
41
-
42
-
43
-
44
-
45
-
46
-
47
-
48
-
49
-
50
-
51
-
52
-
53
-
54
-
55
-
56
-
57
-
58
-
59
-
60
-
61
-
62
-
63
-
64
 |
 |
