Thermador SGS305TS Installation instructions - Page 7
Before You Begin
 |
View all Thermador SGS305TS manuals
Add to My Manuals
Save this manual to your list of manuals |
Page 7 highlights
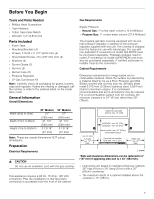
Before You Begin Tools and Parts Needed ▯ Phillips Head Screwdriver ▯ Tape Measure ▯ Teflon Tape (Gas Rated) ▯ Drill with 1/4" (6.5mm) bit Parts Included ▯ Foam Tape ▯ Mounting Brackets (4) ▯ Screws, #10-32 x 2 1/2" (63.8 mm) (4) ▯ Sheet Metal Screws, #8 x 3/8" (9.5 mm) (4) ▯ Washers (4) ▯ Burner Grates (3) ▯ Burners (5) ▯ Burner Caps (5) ▯ Pressure Regulator ▯ LP Gas Conversion Kit Note: Carefully check all packaging for grates, burners, caps and regulator. If parts are missing or damaged, call the number or write to the address listed on the inside back cover. General Information Overall Dimensions Gas Requirements Supply Pressure: ▯ Natural Gas: 7 inches water column (14.9 Millibars) ▯ Propane Gas: 11 inches water column (27.4 Millibars) The propane gas tank must be equipped with its own high pressure regulator in addition to the pressure regulator supplied with this unit. The cooktop is shipped from the factory for use with natural gas. For use with non pedestal LP conversion kit model SNLPKITW must be purchased separately. Pedestal cooktops need to order LP conversion kit model SLPKITPEDW and must also be purchased separately. A certified technician or installer must do the conversion. Cabinet Requirements Dimension requirements in image below are for combustible surfaces. When the surface is protected by a material listed by UL as a Floor Protector and Wall Shield covered with not less than No. 28 MSG sheet metal 0.015 inch (0.38mm) stainless steel, 0.024 inch (0.6mm) aluminum copper, it is considered noncombustible and some dimensions may be reduced. For a noncombustible surface over the cooktop, the minimum clearance is 24" (61cm) rather than 30" (76cm). Width (Side to Side) Depth (Front to Back) Height (Top to Bottom) 30" Models 31" (788 mm) 21 1/4" (540 mm) 3 13/16" (97 mm) 36" Models 37" (940 mm) 21 1/4" (540 mm) 3 13/16" (97 mm) Note: These are overall dimensions NOT cutout dimensions. Preparation Electrical Requirements 9 CAUTION Do not use an extension cord with the gas cooktop. This appliance requires a 60 Hz, 15 Amp, 120 VAC connection. Plan the installation so that the power connection is accessible from the front of the cabinet. Depth from back wall Cabinet max. 13" (330) min.18" (457) *Left side min. 12" (305) SGS(X)30 - min. 30" (762) SGS(X)36 - min. 36" (914) Above counter - min. 30" (762) to Combustible surface Centered over cooktop Rear wall - min. 2" (51) *Right side min. 12" (305) ( )=mm *Side wall clearance dimensions can be reduced to 5" (127 mm) if opposing side wall is ≥ 23" (584 mm). ▯ Instructions are based on standard American cabinets 36" high (91cm) x 24" deep (61cm) with a 25" (63cm) countertop. ▯ The maximum depth of a cabinet installed above the cooktop is 13" (33cm). 7
-
 1
1 -
 2
2 -
 3
3 -
 4
4 -
 5
5 -
 6
6 -
 7
7 -
 8
8 -
 9
9 -
 10
10 -
 11
11 -
 12
12 -
13
-
14
-
15
-
16
-
17
-
18
-
19
-
20
-
21
-
22
-
23
-
24
-
25
-
26
-
27
-
28
-
29
-
30
-
31
-
32
-
33
-
34
-
35
-
36
-
37
-
38
-
39
-
40
-
41
-
42
-
43
-
44
 |
 |