Thermador T30IB800SP Installation Manual - Page 12
Transport of the appliance, Installation preparation, Special installation - manual
 |
View all Thermador T30IB800SP manuals
Add to My Manuals
Save this manual to your list of manuals |
Page 12 highlights
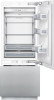
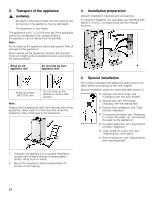
3. Transport of the appliance , WARNING: Be careful, otherwise people who are helping may be injured or the appliance may be damaged. The appliance is very heavy. The appliance is 83 1/8" (2126 mm) tall. If the appliance cannot be transported in an upright position, the appliance can be transported horizontally. Note: Do not raise up the appliance via the side panels. Risk of damage to the appliance! When raising up the appliance, observe the required minimum height at the installation location according to the following table: Raise up via appliance rear Do not raise up from appliance side Minimum height 86"/2185 mm Do not raise up the appliance via the side panels! Note: Always use the appliance dolly from the rear side of the appliance. Never push it in from the front under the appliance. Risk of damage to the appliance! 4. Installation preparation Unpack installation materials and accessories. To simplify installation, the packages are identified with labels A, B and C corresponding with the manual sections. 5. Special installation This symbol indicates that additional steps need to be taken before proceeding to the next chapter. Special installation steps are described after section C. Change over door hinge, see "Changing over the door hinges". Sealing mat, see "Removing/ changing over the sealing mat" Side-by-Side installation, see "Sideby-Side installation". Connecting the water, see "Preparing to connect the water" an "Connecting the water to the appliance". Ice-water dispenser, see "Aligning the ice-water dispenser". Cover strips for a wine unit, see "Attaching the cover strips" Door limitation pin, see "Adjusting the door opening angle". 1. Transport the appliance to a suitable installation location with suitable means of transportation (trolley, lifting truck or hand). 2. Secure the appliance during transportation to prevent it from tipping. 12
-
 1
1 -
2
-
3
-
4
-
5
-
6
-
 7
7 -
 8
8 -
 9
9 -
 10
10 -
 11
11 -
 12
12 -
 13
13 -
 14
14 -
 15
15 -
 16
16 -
 17
17 -
18
-
19
-
20
-
21
-
22
-
23
-
24
-
25
-
26
-
27
-
28
-
29
-
30
-
31
-
32
-
33
-
34
-
35
-
36
-
37
-
38
-
39
-
40
-
41
-
42
-
43
-
44
-
45
-
46
-
47
-
48
-
49
-
50
-
51
-
52
-
53
-
54
-
55
-
56
-
57
-
58
-
59
-
60
-
61
-
62
-
63
-
64
-
65
-
66
-
67
-
68
-
69
-
70
-
71
-
72
-
73
-
74
-
75
-
76
-
77
-
78
-
79
-
80
-
81
-
82
-
83
-
84
-
85
-
86
-
87
-
88
-
89
-
90
-
91
-
92
-
93
-
94
 |
 |
