Thermador T30IB800SP Installation Manual - Page 16
Aligning the appliance in the, installation enclosure, Attaching the appliance to
 |
View all Thermador T30IB800SP manuals
Add to My Manuals
Save this manual to your list of manuals |
Page 16 highlights
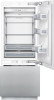
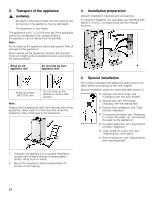
1. Aligning the appliance in the installation enclosure Note: To ensure that the appliance functions correctly, it must be set perfectly levelled. Do not twist or jam the appliance inside the installation enclosure! When adjusting the heightadjustable feet, proceed gradually: Always alternate between left and right, etc. For easier adjustment of the rear feet take the weight off by slightly tilting the appliance forward. Do not bend the appliance against the anti-tipbrackets. The positioning aid on the door have been designed for the following total thickness of door panels: 3/4" (19 mm) 11/2" (38 mm) Always take account of the possible differing thickness of the panel fronts which are to be fitted subsequently. 1. Align the appliance with the cabinet fronts using the positioning aid. Place level over the positioning aid on the door. The height adjustment gauge (b) is used to set this height correctly. The upper edge of the gauge must be in alignment with the mark on the appliance. 2. Unscrew the feet at the front of the appliance until the mark (a) on the appliance is in alignment with the upper edge of the height adjustment gauge (b). 3. Align the appliance vertically using the feet at the back. Use a level! The height-adjustable feet at the front and rear can all be adjusted from the front. Front: with open-ended wrench 1/2" (Width across flats 13 mm) Rear: with 5/16" (8 mm) hex nut driver via flexible shaft. The mark (a) attached at the appliance base is used as a standard gage for height adjustment. When adjusting the height, align this mark at a height of 11/2" (32 mm) above the floor. It is very important to comply with this dimension for the subsequent alignment of the furniture fronts. 2. Attaching the appliance to the installation enclosure It is essential to attach the appliance to the top of the installation enclosure. 1. Screw the attachment plate lugs (top) to the overhead furniture. 2. If there is a fairly large gap above the appliance, fit a wooden beam above the appliance, ensuring that the wooden beam fits the gap exactly. 16
-
 1
1 -
2
-
3
-
4
-
5
-
6
-
7
-
8
-
9
-
10
-
 11
11 -
 12
12 -
 13
13 -
 14
14 -
 15
15 -
 16
16 -
 17
17 -
 18
18 -
 19
19 -
 20
20 -
 21
21 -
22
-
23
-
24
-
25
-
26
-
27
-
28
-
29
-
30
-
31
-
32
-
33
-
34
-
35
-
36
-
37
-
38
-
39
-
40
-
41
-
42
-
43
-
44
-
45
-
46
-
47
-
48
-
49
-
50
-
51
-
52
-
53
-
54
-
55
-
56
-
57
-
58
-
59
-
60
-
61
-
62
-
63
-
64
-
65
-
66
-
67
-
68
-
69
-
70
-
71
-
72
-
73
-
74
-
75
-
76
-
77
-
78
-
79
-
80
-
81
-
82
-
83
-
84
-
85
-
86
-
87
-
88
-
89
-
90
-
91
-
92
-
93
-
94
 |
 |
