Thermador T36BB820SS Installation Manual - Page 13
Attaching the anti-tip-brackets
 |
View all Thermador T36BB820SS manuals
Add to My Manuals
Save this manual to your list of manuals |
Page 13 highlights
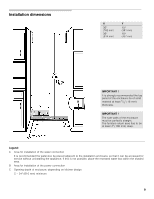
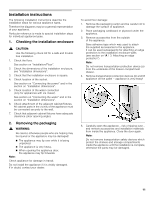
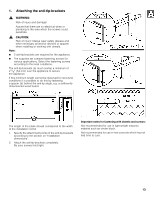
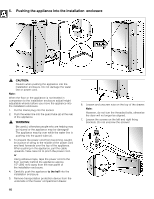
1. Attaching the anti-tip-brackets , WARNING: Risk of injury and damage! Assure that there are no electrical wires or plumbing in the area which the screws could penetrate. , CAUTION: Risk of injury! Always wear safety glasses and other necessary protective devices or apparel when installing or working with dowels. Note: 2 anti-tip-brackets are required for the appliance. The supplied set contains fastening screws for various applications. Select the fastening screws according to the local conditions. The anti-tip-brackets (a) must overlap a minimum of 21/8" (54 mm) over the appliance to secure the appliance. If this minimum length cannot be observed for structural conditions it is possible to do this by fastening a spacer (b) behind the anti-tip angle, e.g. a sufficiently dimensioned wood board. The length of the plank should correspond to the width of the installation niche! 1. Specify the attachment points of the anti-tip-brackets according to the section on "Installation dimensions". 2. Attach the anti-tip-brackets completely. Be sure screws hold tight. Important notes for fastening with dowels and screws: Not recommended for use in light-weight masonry material such as cinder block. Not recommended for use in new concrete which has not had time to cure. 13
-
 1
1 -
2
-
3
-
4
-
5
-
6
-
7
-
 8
8 -
 9
9 -
 10
10 -
 11
11 -
 12
12 -
 13
13 -
 14
14 -
 15
15 -
 16
16 -
 17
17 -
 18
18 -
19
-
20
-
21
-
22
-
23
-
24
-
25
-
26
-
27
-
28
-
29
-
30
-
31
-
32
-
33
-
34
-
35
-
36
-
37
-
38
-
39
-
40
-
41
-
42
-
43
-
44
-
45
-
46
-
47
-
48
-
49
-
50
-
51
-
52
-
53
-
54
-
55
-
56
-
57
-
58
-
59
-
60
-
61
 |
 |
