Thermador WDC30E Installation Instructions - Page 8
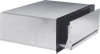
Attach the prepared custom front panel from behind with four wood screws - 30 warming drawer
 |
View all Thermador WDC30E manuals
Add to My Manuals
Save this manual to your list of manuals |
Page 8 highlights
Custom front panel Prepare and attach custom front panel 6 You can attach your own front panel for this warming drawer. This front panel must: have a handle have the dimensions shown on the included template have a thickness of 3/4" (19 mm) at least have all edges finished stand a temperature of 158 ºF (70 ºC). 1. Built custom drawer according to the dimensions shown on template. 2. Put template on the back side of the panel, not on the front side! 3. Mark pilot holes and hole for light wave guide. 4. Drill pilot holes. Be careful not to drill all the way through the panel! Pilot holes should only be 7/16" (11 mm) deep. 5. Drill hole for the light wave guide through the panel. 6. Press plastic light wave guide from the front side into this hole. 7. Attach your own handle. 8. Attach the prepared custom front panel from behind with four wood screws and four washers accordind to figure 1. Test the installation Turn on the PLATES setting. Signal light begins to flash immediately. Display indicates 0:30. Close the drawer. Signal light stops flashing after 10s to 30s. Wait five minutes. Open the drawer. The air in the drawer should be warm. DO NOT place hand directly on drawer bottom, but you should be able to feel the heat coming off the glass. 8
-
 1
1 -
2
-
 3
3 -
 4
4 -
 5
5 -
 6
6 -
 7
7 -
 8
8 -
 9
9 -
 10
10 -
 11
11 -
 12
12 -
 13
13 -
14
-
15
-
16
-
17
-
18
-
19
-
20
-
21
-
22
-
23
-
24
 |
 |
