Toshiba 15DL15 Owners Manual - Page 29
Using the PC setting feature
 |
View all Toshiba 15DL15 manuals
Add to My Manuals
Save this manual to your list of manuals |
Page 29 highlights
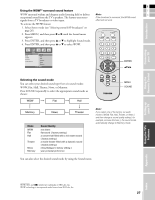
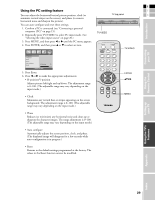
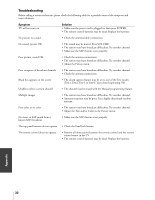
Connecting your TV Using the Remote Control E Using the PC setting feature F You can adjust the horizontal/vertical picture position, clock (to minimize vertical stripes on the screen), and phase (to remove horizontal noise and sharpen the picture). TV top panel S TV/VIDEO VOLUME CHANNEL POWER Introduction You can auto-configure and reset these settings. 1. Confirm a PC is connected (see "Connecting a personal computer (PC)" on page 15). 2. Repeatedly press TV/VIDEO to select PC input mode. (See "Selecting the video input source" on page 20.) TV/VIDEO 3. Press MENU, and then press x or • until the PC menu appears. 4. Press ENTER, and then press y or z to select an item. MUTE POWER TV/VIDEO MTS RECALL TV/VIDEO H-Position V-Position Clock Phase Auto configure Reset PC H-Position 76 ENTER EXIT MENU 5. Press Enter. 6. Press x or • to make the appropriate adjustments. • H-position/V-position Adjusts picture left/right and up/down. The adjustment range is 0-100. (The adjustable range may vary depending on the input mode.) • Clock Minimizes any vertical bars or stripes appearing on the screen background. The adjustment range is 0-100. (The adjustable range may vary depending on the input mode.) 123 456 789 CH RTN 0 100/ CH VOL ENTER VOL CH EXIT MENU CC SOUND PICTURE SLEEP FAV. CH ENTER yzx • MENU • Phase Reduces (or minimizes) any horizontal noise and clears up or sharpens the character images. The range adjustment is 0-100. (The adjustable range may vary depending on the input mode.) • Auto configure Automatically adjusts the screen position, clock, and phase. (The displayed image will disappear for a few seconds while auto-configuration is in progress.) • Reset Returns to the default settings programmed at the factory. The values in the Reset function cannot be modified. Setting up your TV Using the TV's Features Appendix Index 29
-
 1
1 -
2
-
3
-
4
-
5
-
6
-
7
-
8
-
9
-
10
-
11
-
12
-
13
-
14
-
15
-
16
-
17
-
18
-
19
-
20
-
21
-
22
-
23
-
 24
24 -
 25
25 -
 26
26 -
 27
27 -
 28
28 -
 29
29 -
 30
30 -
 31
31 -
 32
32 -
 33
33 -
 34
34 -
35
-
36
 |
 |
