Toshiba 26HL83P User Manual - Page 7
Exploring your new TV
 |
View all Toshiba 26HL83P manuals
Add to My Manuals
Save this manual to your list of manuals |
Page 7 highlights
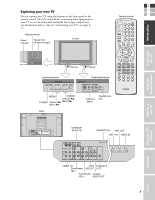
Connecting your TV Exploring your new TV You can operate your TV using the buttons on the front panel or the remote control. The A/V terminals for connecting other equipment to your TV are on the back panel and inside the storage compartment (see illustrations below). Also see "Connecting your TV" on pages 817. Remote sensor Power indicator TheaterLink (IR pass through) TV front E F S Remote control Introduction POWER TV CABLE/SAT LIGHT SLEEP VCR DVD 123 AUDIO1 AUDIO2 MODE 456 789 PIC SIZE ACTION +10 100/ 0 ENT S MENU GUIDE ETUP INFO FAVORITE TLHINEKATER TITLE SUB TITLE FAV AUDI O ENTER POMER POMER Push up Left pocket panel TV/VIDEO MENU VOLUME CHANNEL POWER Push up Right pocket panel VIDEO-3 IN FAV CH VOL EXIT DVD RTN DVD CLEAR CH RTN INPUT RECALL MUTE SLOW/DIR SKIP/SEARCH REW PAUSE/STEP PLAY FF AM/FM STOP REC TV/ VCR DISC POP CH SPLIT POP DIRECT CH FREEZE SWAP CH SCAN SOURCE S-VIDEO VIDEO L/MONO R HEADPHONE AUDIO MENU POWER Channel zy TV/VIDEO Volume x • Menu zy Menu x • VIDEO-3 INPUT Headphones jack Back Using the Remote Control Setting up your TV Using the TV's Features Appendix DVI/HDCP AUDIO IN DVI/HDCP IN ANT OUT ANT-1 IN ANT-2 IN S-VIDEO VIDEO L /MONO DVI/HDCP AUDIO IN R L Y PB L VIDEO Y VAR L /MONO AUDIO PB L L DVI/HDCO IN AUDIO AUDIO PR AUDIO PR R R R COLOR VIDEO 1 VIDEO 2 STREAM HD-1 IN IN COLOR STREAM HD-2 IN AUDIO R R OUT TheaterLink OUT VIDEO 1/2 VIDEO/ TheaterLink ColorStream AUDIO OUT OUT HD-1 ColorStream Variable HD-2 AUDIO OUT ANT 1 OUT ANT( 75 ) ANT 2 7 Index
-
 1
1 -
 2
2 -
 3
3 -
 4
4 -
 5
5 -
 6
6 -
 7
7 -
 8
8 -
 9
9 -
 10
10 -
 11
11 -
 12
12 -
13
-
14
-
15
-
16
-
17
-
18
-
19
-
20
-
21
-
22
-
23
-
24
-
25
-
26
-
27
-
28
-
29
-
30
-
31
-
32
-
33
-
34
-
35
-
36
-
37
-
38
-
39
-
40
-
41
-
42
-
43
-
44
-
45
-
46
-
47
-
48
-
49
-
50
-
51
-
52
-
53
-
54
-
55
-
56
-
57
-
58
-
59
-
60
-
61
-
62
-
63
-
64
-
65
-
66
 |
 |
