Toshiba 40RF350U Owner's Manual - English - Page 43
Setting the HDMI, audio mode
 |
UPC - 022265000991
View all Toshiba 40RF350U manuals
Add to My Manuals
Save this manual to your list of manuals |
Page 43 highlights
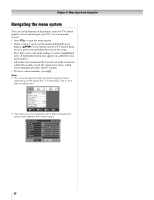
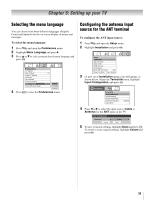
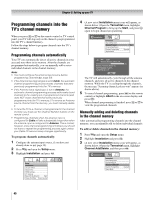
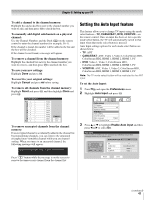
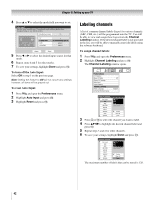
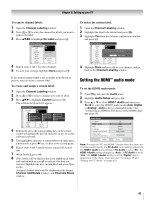
Chapter 5: Setting up your TV To remove channel labels: 1 Open the Channel Labeling window. 2 Press < or , to select the channel for which you want to remove the label. 3 Press BbC c to highlight No Label and press T. Channel Labeling {No Label} A&E ABC ABCFAM ABCHD AMAX AMAXW AMC ANIMAL ANT 24 Press CH UP/DOWN to change channels. Custom Clear All Done 4 Repeat steps 2 and 3 for other channels. 5 To save your settings, highlight Done and press T. If the desired channel label is not available from the list of presets, you can create a custom label. To create and assign a custom label: 1 Open the Channel Labeling window. 2 Press < or , to select a channel you want to label. 3 Press Bb c to highlight Custom and press T. The software keyboard will appear. Channel Labeling {No Label} A&E ANT 24 ABC1 1 A&E 2EdAit BCHCRTaN Cbanccel2 ABCFA4MG H I g h iPchr4easnsgeCHchUanPn/De5lOs.WJNKto L j k l 5 ABCH7D P Q R S p q r s 7 _ AMA1X00 Backspace 8 TUV t u v 8 00 AMAXW AMC Clear All ANIMAL Done S3endD EEXIFT dExiet f 3 6 MNOmn o 6 9 WX Y Zw x y z 9 INPUT Space 4 Repeatedly press the corresponding key on the remote control to highlight the desired character on the on-screen software keyboard. 5 The highlighted character is entered after you either press a different key, press c key, or after a two-second pause. 6 Repeat steps 4 and 5 until you have entered all desired text. 7 When finished, press T. 8 (New labels will be added to the list in alphabetical order and marked with an icon to indicate that they are custom.) Highlight the new custom label and press T to assign. Assigned channel labels will be displayed in the banner, Channel Add/Delete window, and Channels Block window. To delete the custom label: 1 Open the Channel Labeling window. 2 Highlight the label to be deleted and press =. 3 Highlight Yes from the deletion confirmation window and press T. Channel Labeling TIMES TLC TMC TMCX TMCXw TMCw TNT TNTHD TOCDEFG ANT 24 Delete the selected custom label? Press CH UP/DOWN to change channels. No Yes Custom Clear All Done 4 Highlight Done and press T to save changes, and go back to the Channel Labeling window. Setting the HDMI™ audio mode To set the HDMI audio mode: 1 Press Y and open the Audio menu. 2 Highlight Audio Setup and press T. 3 Press B or b to select HDMI 1 Audio and then press C or c to select the HDMI 1 audio mode (Auto, Digital, or Analog). (Auto is the recommended mode.) See "Connecting an HDMI or DVI device to the HDMI input" (- page 19). Audio Setup PC Audio HDMI 1 Audio MTS Language Optical Output Format Dolby Digital Dynamic Range Control Reset No Auto Stereo English Dolby Digital Compressed Done Note: Because the PC and HDMI-1 inputs share the same set of analog audio inputs, the PC Audio menu setting influences the HDMI 1 Audio menu setting. If PC Audio is set to "No," the HDMI 1 Audio setting changes to "Auto." If PC Audio is set to "Yes," the HDMI 1 Audio setting is set to "Digital" and is grayed out in the menu. (Also see item 5 on page 12 and "Setting the PC Audio" on page 65.) 43
-
 1
1 -
2
-
3
-
4
-
5
-
6
-
7
-
8
-
9
-
10
-
11
-
12
-
13
-
14
-
15
-
16
-
17
-
18
-
19
-
20
-
21
-
22
-
23
-
24
-
25
-
26
-
27
-
28
-
29
-
30
-
31
-
32
-
33
-
34
-
35
-
36
-
37
-
 38
38 -
 39
39 -
 40
40 -
 41
41 -
 42
42 -
 43
43 -
 44
44 -
 45
45 -
 46
46 -
 47
47 -
 48
48 -
49
-
50
-
51
-
52
-
53
-
54
-
55
-
56
-
57
-
58
-
59
-
60
-
61
-
62
-
63
-
64
-
65
-
66
-
67
-
68
-
69
-
70
-
71
-
72
-
73
-
74
-
75
-
76
-
77
-
78
-
79
-
80
-
81
-
82
-
83
-
84
-
85
-
86
 |
 |
