Toshiba 61H70 Owners Manual - Page 32
to highlight SAVE NEW PREFERENCE., Saving new preference, Using the flesh tone feature
 |
View all Toshiba 61H70 manuals
Add to My Manuals
Save this manual to your list of manuals |
Page 32 highlights
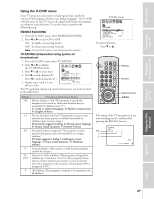
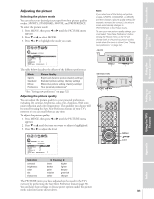
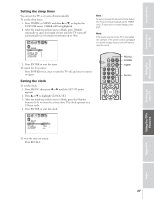
Index Appendix Using the TV's Features Setting up your TV Using the Remote Control Connecting your TV Introduction Saving new preference You can save the PICTURE items (contrast, brightness, color, tint, and sharpness) you have adjusted in the picture preference mode. To save new preference: 1. Press MENU, then press x or • until the PICTURE menu appears. 2. Press y or z to highlight SAVE NEW PREFERENCE. 3. Press x or •. 1 2 3 4 5 6 7 8 9 10 11 12 13 14 15 16 17 18 19 20 21 22 23 24 25 26 27 28 29 30 31 32 33 34 35 1 1 2 2 3 3 4 4 5 5 6 6 7 P I CTURE ANTENNA 7 8 9 MODE 10 8 PREFERENCE 9 10 11 11 12 FLESH TONE OFF 12 13 DNR OFF 13 14 COLOR 14 15 TEMPERATURE MEDI UM 15 16 CONVERGENCE 16 17 SAVE NEW PREFERENCE DONE 17 18 18 1 2 3 4 5 6 7 8 9 10 11 12 13 14 15 16 17 18 19 20 21 22 23 24 25 26 27 28 29 30 31 32 33 34 35 You can choose preset options by selecting the PREFERENCE mode in the picture mode feature. See page 39. Using the flesh tone feature This feature allows you to obtain natural flesh tones by correcting the difference of tint between TV stations. To turn on the flesh tone feature: 1. Press MENU, then press x or • until the PICTURE menu appears. 2. Press y or z to highlight FLESH TONE. 3. Press x or • to highlight ON. 1 2 3 4 5 6 7 8 9 10 11 12 13 14 15 16 17 18 19 20 21 22 23 24 25 26 27 28 29 30 31 32 33 34 35 1 1 2 2 3 3 4 4 5 5 6 6 7 P I CTURE ANTENNA 7 8 9 MODE 10 8 PREFERENCE 9 10 11 11 12 FLESH TONE ON / OFF 12 13 DNR OFF 13 14 COLOR 14 15 TEMPERATURE MEDI UM 15 16 CONVERGENCE 16 17 SAVE NEW PREFERENCE 17 18 18 1 2 3 4 5 6 7 8 9 10 11 12 13 14 15 16 17 18 19 20 21 22 23 24 25 26 27 28 29 30 31 32 33 34 35 To turn off the flesh tone feature: Choose OFF in step 3 above. Using the Digital Noise Reduction (DNR) feature This feature allows you to reduce visible interference in your TV picture. This is useful when receiving a broadcast with a weak signal or playing back a video cassette or disc damaged by repeated use. To turn on the DNR feature: 1. Press MENU, then press x or • until the PICTURE menu appears. 2. Press y or z to highlight DNR. 3. Press x or • to highlight AUTO. 1 2 3 4 5 6 7 8 9 10 11 12 13 14 15 16 17 18 19 20 21 22 23 24 25 26 27 28 29 30 31 32 33 34 35 1 1 2 2 3 3 4 4 5 5 6 6 7 P I CTURE ANTENNA 7 8 9 MODE 10 8 PREFERENCE 9 10 11 11 12 FLESH TONE ON 12 13 DNR AUTO / OFF 13 14 COLOR 14 15 TEMPERATURE MEDI UM 15 16 CONVERGENCE 16 17 SAVE NEW PREFERENCE 17 18 18 1 2 3 4 5 6 7 8 9 10 11 12 13 14 15 16 17 18 19 20 21 22 23 24 25 26 27 28 29 30 31 32 33 34 35 To turn off the DNR feature: Choose OFF in step 3 above. 32 LIGHT RECALL POWER TV CABLE VCR MUTE TV/VIDEO TIMER 123 CH 456 789 CH RTN VOL 100 0 ENT STROBE FAVORITE ADV/ PIP CH FAV MENU/ ENTER FAV MENU EXIT PREVIEW ADV/ PIP CH
-
 1
1 -
2
-
3
-
4
-
5
-
6
-
7
-
8
-
9
-
10
-
11
-
12
-
13
-
14
-
15
-
16
-
17
-
18
-
19
-
20
-
21
-
22
-
23
-
24
-
25
-
26
-
 27
27 -
 28
28 -
 29
29 -
 30
30 -
 31
31 -
 32
32 -
 33
33 -
 34
34 -
 35
35 -
 36
36 -
 37
37 -
38
-
39
-
40
-
41
-
42
-
43
-
44
-
45
-
46
-
47
-
48
 |
 |
