Toshiba 65L7300U User's Guide for Model Series L4300U and L7300U TV - Page 6
Choosing a location for your LED TV - 65
 |
View all Toshiba 65L7300U manuals
Add to My Manuals
Save this manual to your list of manuals |
Page 6 highlights
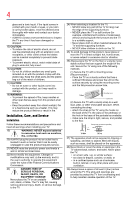
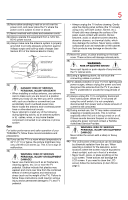
6 Service 45) WARNING: RISK OF ELECTRIC SHOCK! Never attempt to service the TV yourself. Opening and removing the covers may expose you to dangerous voltage or other hazards. Failure to follow this WARNING may result in death or serious injury. Refer all servicing not specified in this manual to a Toshiba Authorized Service Provider. 46) If you have the TV serviced: • Ask the service technician to use only replacement parts specified by the manufacturer. • Upon completion of service, ask the service technician to perform routine safety checks to determine that the TV is in safe operating condition. Choosing a location for your LED TV To Display your LED TV on the included Pedestal Stand: Observe the following safety precautions: 1) Read and follow the pedestal assembly instructions included with the pedestal. CAUTION: Before beginning pedestal assembly, carefully lay the front of the LCD Panel face down on a flat, cushioned surface such as a quilt or blanket. Leave the bottom of the unit protruding over the edge of the surface and assemble the pedestal as indicated below. Note: Extreme care should always be used when attaching the pedestal stand to avoid damage to the LCD panel. 2) Place the TV on a sturdy, level surface that can support the weight of the TV. 3) Be sure to secure the TV to a wall, pillar, surface, or other immovable structure see item 26) page 4 for additional details. To Display your LED TV using a Wall Bracket: If you decide to wall mount your LED TV, always use a wall bracket Listed by an independent laboratory (such as UL, CSA, ETL) that is appropriate for the size and weight of the TV (see page 2): 1) CAUTION: Two people are required for installation. 2) Unplug and remove any cables and/or other component connectors from the rear of the TV. 3) Remove the screws of the VESA Mounting Pattern show in the table if applicable. CAUTION: Do not use the screws removed from the back cover to attach the wall mount bracket to the TV. 4) Always use the screws supplied or recommended by the wall mount manufacturer. 5) Follow the instructions provided with your wall bracket. Before proceeding, make sure the appropriate bracket(s) are attached to the wall and the back of the TV as described in the instructions provided with the wall bracket. 6) After attaching the appropriate bracket(s) to the wall and the back of the TV, remove the pedestal stand from the TV, as described below. 7) VESA Mounting Pattern TV Size Hole Pattern (HxV) Screw Size 32L4300U 200x200 mm M6 39L4300U 200x200 mm M6 50L4300U 400x400 mm M8 50L7300U 400x200 mm M6 58L7300U 400x400 mm M6 65L7300U 400x400 mm M6 (unit in mm) Removing the Pedestal Stand 1) Carefully lay the front of the unit face down on a flat, cushioned surface such as a quilt or blanket. Leave the stand protruding over the edge of the surface. Note: Extreme care should always be used when removing the pedestal stand to avoid damage to the LCD panel. 2) Remove the screws shown in the below diagram. This will allow removal of the pedestal stand. 3) Once you have removed all of the screws holding the pedestal stand in place, remove the pedestal stand from the TV. L7300 Series 50"/ 58"/ 65" VESA Mounting Pattern Four stand screws One clip
-
 1
1 -
 2
2 -
 3
3 -
 4
4 -
 5
5 -
 6
6 -
 7
7 -
 8
8 -
 9
9 -
 10
10 -
 11
11 -
 12
12 -
13
-
14
-
15
-
16
-
17
-
18
-
19
-
20
-
21
-
22
-
23
-
24
-
25
-
26
-
27
-
28
-
29
-
30
-
31
-
32
-
33
-
34
-
35
-
36
-
37
-
38
-
39
-
40
-
41
-
42
-
43
-
44
-
45
-
46
-
47
-
48
-
49
-
50
-
51
-
52
-
53
-
54
-
55
-
56
-
57
-
58
-
59
-
60
-
61
-
62
-
63
-
64
-
65
-
66
-
67
-
68
-
69
-
70
-
71
-
72
-
73
-
74
-
75
-
76
-
77
-
78
-
79
-
80
-
81
-
82
-
83
-
84
-
85
-
86
-
87
-
88
-
89
-
90
-
91
-
92
-
93
-
94
-
95
-
96
-
97
-
98
-
99
-
100
-
101
-
102
-
103
-
104
-
105
-
106
-
107
-
108
-
109
-
110
-
111
-
112
-
113
-
114
-
115
-
116
-
117
-
118
-
119
-
120
-
121
-
122
-
123
-
124
-
125
-
126
-
127
-
128
-
129
-
130
-
131
-
132
-
133
-
134
-
135
-
136
-
137
-
138
-
139
-
140
-
141
-
142
-
143
-
144
-
145
-
146
-
147
-
148
-
149
-
150
-
151
-
152
-
153
-
154
-
155
-
156
-
157
-
158
-
159
-
160
-
161
-
162
-
163
-
164
-
165
-
166
-
167
-
168
-
169
-
170
-
171
-
172
-
173
-
174
-
175
-
176
-
177
-
178
-
179
-
180
-
181
-
182
-
183
-
184
-
185
-
186
 |
 |