Toshiba A105 S4064 Maintenance Manual - Page 218
Touch Pad and Button Board, Replacement Procedure
 |
UPC - 032017706019
View all Toshiba A105 S4064 manuals
Add to My Manuals
Save this manual to your list of manuals |
Page 218 highlights
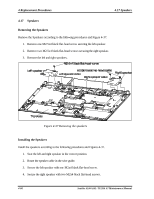
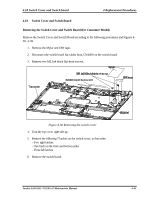
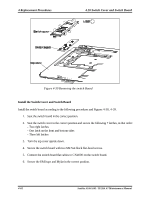
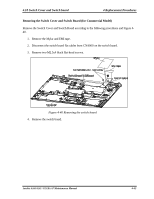
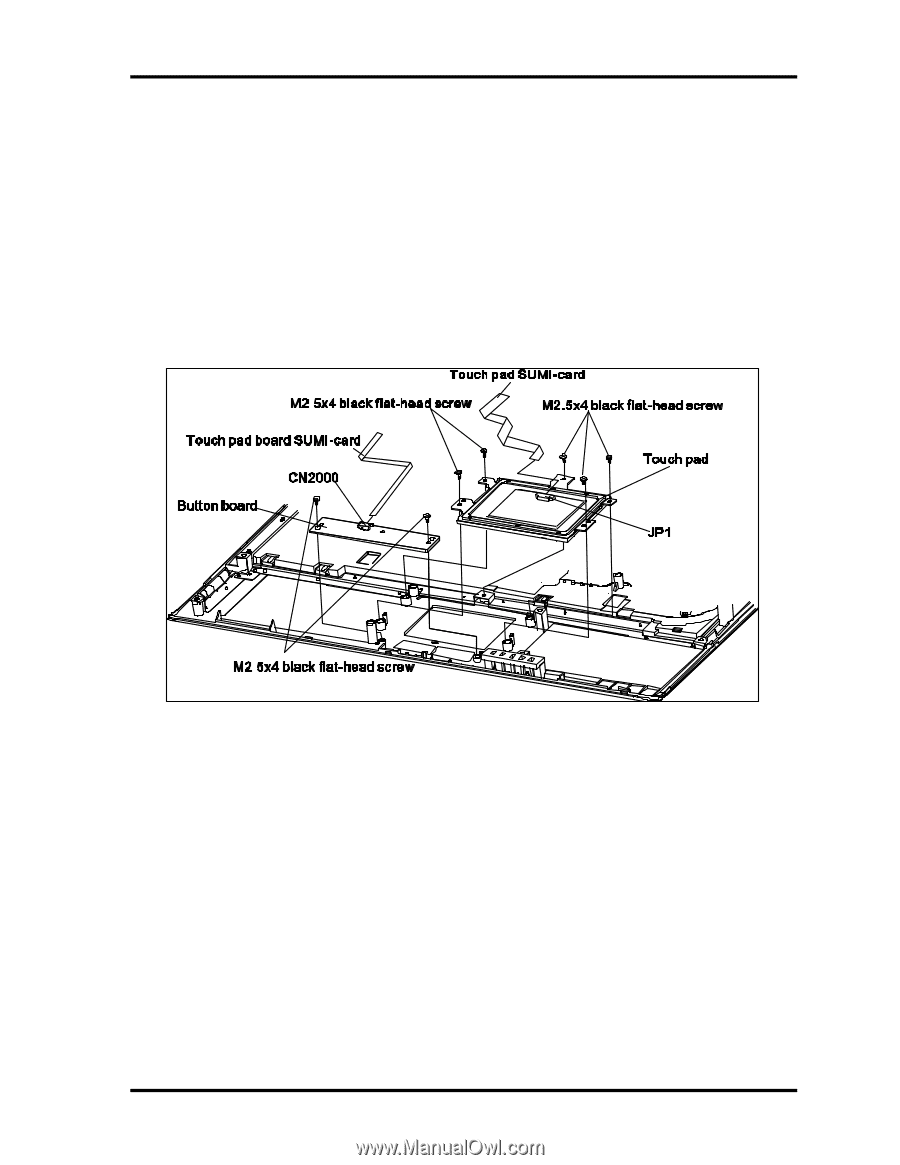
4.19 Touch Pad and Button Board 4 Replacement Procedures 4.19 Touch Pad and Button Board Removing the Touch Pad and Button Board (for Consumer Model) Remove the touch pad and button board according to the following procedures and Figure 4-41. 1. Disconnect the touch pad flat cables from JP1 on the touch pad. 2. Remove five M2.5x4 black flat-head screws securing the touch pad. 3. Remove the touch pad. Figure 4-41 Removing the touch pad and button board 4. Remove two M2.5x3 flat-round-head screws securing the button board. 5. Remove the button board. 6. Disconnect the button board flat cable from CN2000 on the button board. Satellite A100/A105 / TECRA A7 Maintenance Manual 4-65
-
 1
1 -
2
-
3
-
4
-
5
-
6
-
7
-
8
-
9
-
10
-
11
-
12
-
13
-
14
-
15
-
16
-
17
-
18
-
19
-
20
-
21
-
22
-
23
-
24
-
25
-
26
-
27
-
28
-
29
-
30
-
31
-
32
-
33
-
34
-
35
-
36
-
37
-
38
-
39
-
40
-
41
-
42
-
43
-
44
-
45
-
46
-
47
-
48
-
49
-
50
-
51
-
52
-
53
-
54
-
55
-
56
-
57
-
58
-
59
-
60
-
61
-
62
-
63
-
64
-
65
-
66
-
67
-
68
-
69
-
70
-
71
-
72
-
73
-
74
-
75
-
76
-
77
-
78
-
79
-
80
-
81
-
82
-
83
-
84
-
85
-
86
-
87
-
88
-
89
-
90
-
91
-
92
-
93
-
94
-
95
-
96
-
97
-
98
-
99
-
100
-
101
-
102
-
103
-
104
-
105
-
106
-
107
-
108
-
109
-
110
-
111
-
112
-
113
-
114
-
115
-
116
-
117
-
118
-
119
-
120
-
121
-
122
-
123
-
124
-
125
-
126
-
127
-
128
-
129
-
130
-
131
-
132
-
133
-
134
-
135
-
136
-
137
-
138
-
139
-
140
-
141
-
142
-
143
-
144
-
145
-
146
-
147
-
148
-
149
-
150
-
151
-
152
-
153
-
154
-
155
-
156
-
157
-
158
-
159
-
160
-
161
-
162
-
163
-
164
-
165
-
166
-
167
-
168
-
169
-
170
-
171
-
172
-
173
-
174
-
175
-
176
-
177
-
178
-
179
-
180
-
181
-
182
-
183
-
184
-
185
-
186
-
187
-
188
-
189
-
190
-
191
-
192
-
193
-
194
-
195
-
196
-
197
-
198
-
199
-
200
-
201
-
202
-
203
-
204
-
205
-
206
-
207
-
208
-
209
-
210
-
211
-
212
-
 213
213 -
 214
214 -
 215
215 -
 216
216 -
 217
217 -
 218
218 -
 219
219 -
 220
220 -
 221
221 -
 222
222 -
 223
223 -
224
-
225
-
226
-
227
-
228
-
229
-
230
-
231
-
232
-
233
-
234
-
235
-
236
-
237
-
238
-
239
-
240
-
241
-
242
-
243
-
244
-
245
-
246
-
247
-
248
-
249
-
250
-
251
-
252
-
253
-
254
-
255
-
256
-
257
-
258
-
259
-
260
-
261
-
262
-
263
-
264
-
265
-
266
-
267
-
268
-
269
-
270
-
271
-
272
-
273
-
274
-
275
-
276
-
277
-
278
-
279
-
280
-
281
-
282
-
283
-
284
-
285
-
286
-
287
-
288
-
289
-
290
-
291
-
292
-
293
-
294
 |
 |
4.19 Touch Pad and Button Board
4 Replacement Procedure
s
Satellite A100/A105 / TECRA A7
Maintenance Manual
4
-
65
4.19
Touch Pad and Button Board
Removing the Touch Pad and Button Board (for Consumer Model)
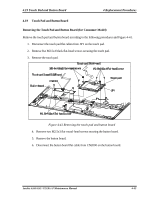
Remove the touch pad and button board according to the following procedures and Figure 4-41.
1.
Disconnect the touch pad flat cables from JP1 on the touch pad.
2.
Remove five M2.5x4 black flat-head screws securing the touch pad.
3.
Remove the touch pad.
Figure 4-41 Removing the touch pad and button board
4.
Remove two M2.5x3 flat-round-head screws securing the button board.
5.
Remove the button board.
6.
Disconnect the button board flat cable from CN2000 on the button board.