Toshiba M305-S4815 Toshiba User's Guide for Satellite M305 (Windows Vista) - Page 100
Inserting an optical disc, Grasp the tray and pull it fully open.
 |
View all Toshiba M305-S4815 manuals
Add to My Manuals
Save this manual to your list of manuals |
Page 100 highlights
100 Learning the Basics Using the optical drive Inserting an optical disc To insert an optical disc into the drive: 1 Make sure the computer is turned on. The drive will not open if the computer's power is off. 2 Make sure the drive's in-use indicator light is off. 3 Press the drive's eject button. The disc tray slides partially out of the drive (about 1 inch). 4 Grasp the tray and pull it fully open. (Sample Illustration) Drive tray fully extended 5 Hold the disc by its edges and check that it is free of dust. If the disc is dusty, clean it as described in "Caring for optical discs" on page 103. 6 Place the disc carefully in the disc tray, label side up. (Sample Illustration) Positioning the disc in the drive
-
 1
1 -
2
-
3
-
4
-
5
-
6
-
7
-
8
-
9
-
10
-
11
-
12
-
13
-
14
-
15
-
16
-
17
-
18
-
19
-
20
-
21
-
22
-
23
-
24
-
25
-
26
-
27
-
28
-
29
-
30
-
31
-
32
-
33
-
34
-
35
-
36
-
37
-
38
-
39
-
40
-
41
-
42
-
43
-
44
-
45
-
46
-
47
-
48
-
49
-
50
-
51
-
52
-
53
-
54
-
55
-
56
-
57
-
58
-
59
-
60
-
61
-
62
-
63
-
64
-
65
-
66
-
67
-
68
-
69
-
70
-
71
-
72
-
73
-
74
-
75
-
76
-
77
-
78
-
79
-
80
-
81
-
82
-
83
-
84
-
85
-
86
-
87
-
88
-
89
-
90
-
91
-
92
-
93
-
94
-
 95
95 -
 96
96 -
 97
97 -
 98
98 -
 99
99 -
 100
100 -
 101
101 -
 102
102 -
 103
103 -
 104
104 -
 105
105 -
106
-
107
-
108
-
109
-
110
-
111
-
112
-
113
-
114
-
115
-
116
-
117
-
118
-
119
-
120
-
121
-
122
-
123
-
124
-
125
-
126
-
127
-
128
-
129
-
130
-
131
-
132
-
133
-
134
-
135
-
136
-
137
-
138
-
139
-
140
-
141
-
142
-
143
-
144
-
145
-
146
-
147
-
148
-
149
-
150
-
151
-
152
-
153
-
154
-
155
-
156
-
157
-
158
-
159
-
160
-
161
-
162
-
163
-
164
-
165
-
166
-
167
-
168
-
169
-
170
-
171
-
172
-
173
-
174
-
175
-
176
-
177
-
178
-
179
-
180
-
181
-
182
-
183
-
184
-
185
-
186
-
187
-
188
-
189
-
190
-
191
-
192
-
193
-
194
-
195
-
196
-
197
-
198
-
199
-
200
-
201
-
202
-
203
-
204
-
205
-
206
-
207
-
208
-
209
-
210
-
211
-
212
-
213
-
214
-
215
-
216
-
217
-
218
-
219
-
220
-
221
-
222
-
223
-
224
-
225
-
226
-
227
-
228
-
229
-
230
-
231
-
232
-
233
 |
 |

100
Learning the Basics
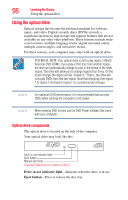
Using the optical drive
Inserting an optical disc
To insert an optical disc into the drive:
1
Make sure the computer is turned on.
The drive will not open if the computer’s power is off.
2
Make sure the drive’s in-use indicator light is off.
3
Press the drive’s eject button.
The disc tray slides partially out of the drive (about 1 inch).
4
Grasp the tray and pull it fully open.
(Sample Illustration) Drive tray fully extended
5
Hold the disc by its edges and check that it is free of dust.
If the disc is dusty, clean it as described in
“Caring for optical
discs” on page 103
.
6
Place the disc carefully in the disc tray, label side up.
(Sample Illustration) Positioning the disc in the drive