Toshiba Qosmio F50 Toshiba User's Guide for Qosmio F55 (Windows Vista) - Page 137
Using an ExpressCard®
 |
View all Toshiba Qosmio F50 manuals
Add to My Manuals
Save this manual to your list of manuals |
Page 137 highlights
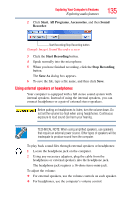
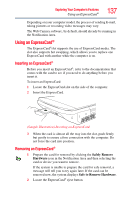
Exploring Your Computer's Features Using an ExpressCard® 137 Depending on your computer model, the process of sending E-mail, taking pictures or recording video messages may vary. The Web Camera software, by default, should already be running in the Notification Area. Using an ExpressCard® The ExpressCard®slot supports the use of ExpressCard media. The slot also supports hot swapping, which allows you to replace one ExpressCard with another while the computer is on. Inserting an ExpressCard® Before you insert an ExpressCard®, refer to the documentation that comes with the card to see if you need to do anything before you insert it. To insert an ExpressCard: 1 Locate the ExpressCard slot on the side of the computer. 2 Insert the ExpressCard. (Sample Illustration) Inserting an ExpressCard 3 When the card is almost all the way into the slot, push firmly but gently to ensure a firm connection with the computer. Do not force the card into position. Removing an ExpressCard® 1 Prepare the card for removal by clicking the Safely Remove Hardware icon in the Notification Area and then selecting the card or device you want to remove. If the system is unable to prepare the card for safe removal, a message will tell you to try again later. If the card can be removed now, the system displays Safe to Remove Hardware. 2 Locate the ExpressCard® eject button.
-
 1
1 -
2
-
3
-
4
-
5
-
6
-
7
-
8
-
9
-
10
-
11
-
12
-
13
-
14
-
15
-
16
-
17
-
18
-
19
-
20
-
21
-
22
-
23
-
24
-
25
-
26
-
27
-
28
-
29
-
30
-
31
-
32
-
33
-
34
-
35
-
36
-
37
-
38
-
39
-
40
-
41
-
42
-
43
-
44
-
45
-
46
-
47
-
48
-
49
-
50
-
51
-
52
-
53
-
54
-
55
-
56
-
57
-
58
-
59
-
60
-
61
-
62
-
63
-
64
-
65
-
66
-
67
-
68
-
69
-
70
-
71
-
72
-
73
-
74
-
75
-
76
-
77
-
78
-
79
-
80
-
81
-
82
-
83
-
84
-
85
-
86
-
87
-
88
-
89
-
90
-
91
-
92
-
93
-
94
-
95
-
96
-
97
-
98
-
99
-
100
-
101
-
102
-
103
-
104
-
105
-
106
-
107
-
108
-
109
-
110
-
111
-
112
-
113
-
114
-
115
-
116
-
117
-
118
-
119
-
120
-
121
-
122
-
123
-
124
-
125
-
126
-
127
-
128
-
129
-
130
-
131
-
 132
132 -
 133
133 -
 134
134 -
 135
135 -
 136
136 -
 137
137 -
 138
138 -
 139
139 -
 140
140 -
 141
141 -
 142
142 -
143
-
144
-
145
-
146
-
147
-
148
-
149
-
150
-
151
-
152
-
153
-
154
-
155
-
156
-
157
-
158
-
159
-
160
-
161
-
162
-
163
-
164
-
165
-
166
-
167
-
168
-
169
-
170
-
171
-
172
-
173
-
174
-
175
-
176
-
177
-
178
-
179
-
180
-
181
-
182
-
183
-
184
-
185
-
186
-
187
-
188
-
189
-
190
-
191
-
192
-
193
-
194
-
195
-
196
-
197
-
198
-
199
-
200
-
201
-
202
-
203
-
204
-
205
-
206
-
207
-
208
-
209
-
210
-
211
-
212
-
213
-
214
-
215
-
216
-
217
-
218
-
219
-
220
-
221
-
222
-
223
-
224
-
225
-
226
-
227
-
228
-
229
-
230
-
231
-
232
-
233
-
234
-
235
-
236
-
237
 |
 |
