Toshiba S10 PTSB3C-0K709C Users Manual Canada; English - Page 78
Removing an ExpressCard, Safely Remove Hardware, ExpressCard
 |
View all Toshiba S10 PTSB3C-0K709C manuals
Add to My Manuals
Save this manual to your list of manuals |
Page 78 highlights
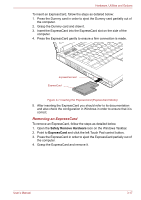
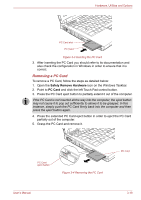
Hardware, Utilities and Options To insert an ExpressCard, follow the steps as detailed below: 1. Press the Dummy card in order to eject the Dummy card partially out of the computer. 2. Grasp the Dummy card and draw it. 3. Insert the ExpressCard into the ExpressCard slot on the side of the computer. 4. Press the ExpressCard gently to ensure a firm connection is made. ExpressCard slot ExpressCard Figure 3-1 Inserting the ExpressCard (ExpressCard Model) 5. After inserting the ExpressCard you should refer to its documentation and also check the configuration in Windows in order to ensure that it is correct. Removing an ExpressCard To remove an ExpressCard, follow the steps as detailed below. 1. Open the Safely Remove Hardware icon on the Windows Taskbar. 2. Point to ExpressCard and click the left Touch Pad control button. 3. Press the ExpressCard in order to eject the ExpressCard partially out of the computer. 4. Grasp the ExpressCard and remove it. User's Manual 3-17
-
 1
1 -
2
-
3
-
4
-
5
-
6
-
7
-
8
-
9
-
10
-
11
-
12
-
13
-
14
-
15
-
16
-
17
-
18
-
19
-
20
-
21
-
22
-
23
-
24
-
25
-
26
-
27
-
28
-
29
-
30
-
31
-
32
-
33
-
34
-
35
-
36
-
37
-
38
-
39
-
40
-
41
-
42
-
43
-
44
-
45
-
46
-
47
-
48
-
49
-
50
-
51
-
52
-
53
-
54
-
55
-
56
-
57
-
58
-
59
-
60
-
61
-
62
-
63
-
64
-
65
-
66
-
67
-
68
-
69
-
70
-
71
-
72
-
 73
73 -
 74
74 -
 75
75 -
 76
76 -
 77
77 -
 78
78 -
 79
79 -
 80
80 -
 81
81 -
 82
82 -
 83
83 -
84
-
85
-
86
-
87
-
88
-
89
-
90
-
91
-
92
-
93
-
94
-
95
-
96
-
97
-
98
-
99
-
100
-
101
-
102
-
103
-
104
-
105
-
106
-
107
-
108
-
109
-
110
-
111
-
112
-
113
-
114
-
115
-
116
-
117
-
118
-
119
-
120
-
121
-
122
-
123
-
124
-
125
-
126
-
127
-
128
-
129
-
130
-
131
-
132
-
133
-
134
-
135
-
136
-
137
-
138
-
139
-
140
-
141
-
142
-
143
-
144
-
145
-
146
-
147
-
148
-
149
-
150
-
151
-
152
-
153
-
154
-
155
-
156
-
157
-
158
-
159
-
160
-
161
-
162
-
163
-
164
-
165
-
166
-
167
-
168
-
169
-
170
-
171
-
172
-
173
-
174
-
175
-
176
-
177
-
178
-
179
-
180
-
181
-
182
-
183
-
184
-
185
-
186
-
187
-
188
-
189
-
190
-
191
-
192
-
193
-
194
-
195
-
196
-
197
-
198
-
199
-
200
-
201
-
202
-
203
-
204
-
205
-
206
-
207
-
208
-
209
-
210
-
211
-
212
-
213
-
214
-
215
-
216
-
217
-
218
-
219
-
220
-
221
-
222
-
223
-
224
-
225
-
226
-
227
-
228
-
229
-
230
-
231
-
232
-
233
-
234
-
235
-
236
-
237
-
238
-
239
-
240
-
241
-
242
-
243
-
244
-
245
 |
 |
