Toshiba Satellite 1415-S174 User Manual - Page 162
Lesson 13: Using System Restore
 |
View all Toshiba Satellite 1415-S174 manuals
Add to My Manuals
Save this manual to your list of manuals |
Page 162 highlights
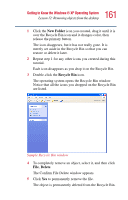
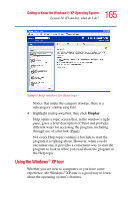
162 Getting to Know the Windows® XP Operating System Lesson 13: Using System Restore Later on-in your real work, not in this tutorial-you will use the Recycle Bin to delete other objects such as folders, documents, and sometimes even programs. Still, the process is the same. Just drag an object's icon to the Recycle Bin. If you change your mind and want to restore an object you sent to the Recycle Bin, select the object with the secondary button and click Restore. The operating system restores the object to the place from which it was deleted. You can also restore the object by dragging it to the desktop. But when you are absolutely certain that you never want to see it again, delete it from the Recycle Bin. To delete everything from the Recycle Bin at once, choose Empty Recycle Bin from the File menu. HINT: Empty the Recycle Bin periodically. Even though an item is moved to the Recycle Bin, it still uses valuable space on the hard disk drive until it is deleted from the Recycle Bin. Lesson 13: Using System Restore The System Restore feature allows you to return your computer to the way it was configured on a specific date or time, a "restore point." This is useful if you are reconfiguring your computer for new hardware or software. In the event that your hardware or software causes your computer to malfunction, you can remove the offending item(s) and restore the system to the state it was in at the preset time. To get to System Restore, click Start, click All Programs, point to Accessories and System Tool, and click System Restore. The System Restore Welcome screen appears.
-
 1
1 -
2
-
3
-
4
-
5
-
6
-
7
-
8
-
9
-
10
-
11
-
12
-
13
-
14
-
15
-
16
-
17
-
18
-
19
-
20
-
21
-
22
-
23
-
24
-
25
-
26
-
27
-
28
-
29
-
30
-
31
-
32
-
33
-
34
-
35
-
36
-
37
-
38
-
39
-
40
-
41
-
42
-
43
-
44
-
45
-
46
-
47
-
48
-
49
-
50
-
51
-
52
-
53
-
54
-
55
-
56
-
57
-
58
-
59
-
60
-
61
-
62
-
63
-
64
-
65
-
66
-
67
-
68
-
69
-
70
-
71
-
72
-
73
-
74
-
75
-
76
-
77
-
78
-
79
-
80
-
81
-
82
-
83
-
84
-
85
-
86
-
87
-
88
-
89
-
90
-
91
-
92
-
93
-
94
-
95
-
96
-
97
-
98
-
99
-
100
-
101
-
102
-
103
-
104
-
105
-
106
-
107
-
108
-
109
-
110
-
111
-
112
-
113
-
114
-
115
-
116
-
117
-
118
-
119
-
120
-
121
-
122
-
123
-
124
-
125
-
126
-
127
-
128
-
129
-
130
-
131
-
132
-
133
-
134
-
135
-
136
-
137
-
138
-
139
-
140
-
141
-
142
-
143
-
144
-
145
-
146
-
147
-
148
-
149
-
150
-
151
-
152
-
153
-
154
-
155
-
156
-
 157
157 -
 158
158 -
 159
159 -
 160
160 -
 161
161 -
 162
162 -
 163
163 -
 164
164 -
 165
165 -
 166
166 -
 167
167 -
168
-
169
-
170
-
171
-
172
-
173
-
174
-
175
-
176
-
177
-
178
-
179
-
180
-
181
-
182
-
183
-
184
-
185
-
186
-
187
-
188
-
189
-
190
-
191
-
192
-
193
-
194
-
195
-
196
-
197
-
198
-
199
-
200
-
201
-
202
-
203
-
204
-
205
-
206
-
207
-
208
-
209
-
210
-
211
-
212
-
213
-
214
-
215
-
216
-
217
-
218
-
219
-
220
-
221
-
222
-
223
-
224
-
225
-
226
-
227
-
228
-
229
-
230
-
231
-
232
-
233
-
234
-
235
-
236
-
237
-
238
-
239
-
240
-
241
-
242
-
243
-
244
-
245
-
246
-
247
-
248
-
249
-
250
-
251
-
252
-
253
-
254
-
255
-
256
-
257
-
258
-
259
-
260
-
261
-
262
-
263
-
264
-
265
-
266
-
267
-
268
-
269
-
270
-
271
 |
 |