Toshiba Satellite L510 PSLQ0C-02Q00C Users Manual Canada; English - Page 132
Inserting a Memory Media, Removing a Memory Media
 |
View all Toshiba Satellite L510 PSLQ0C-02Q00C manuals
Add to My Manuals
Save this manual to your list of manuals |
Page 132 highlights
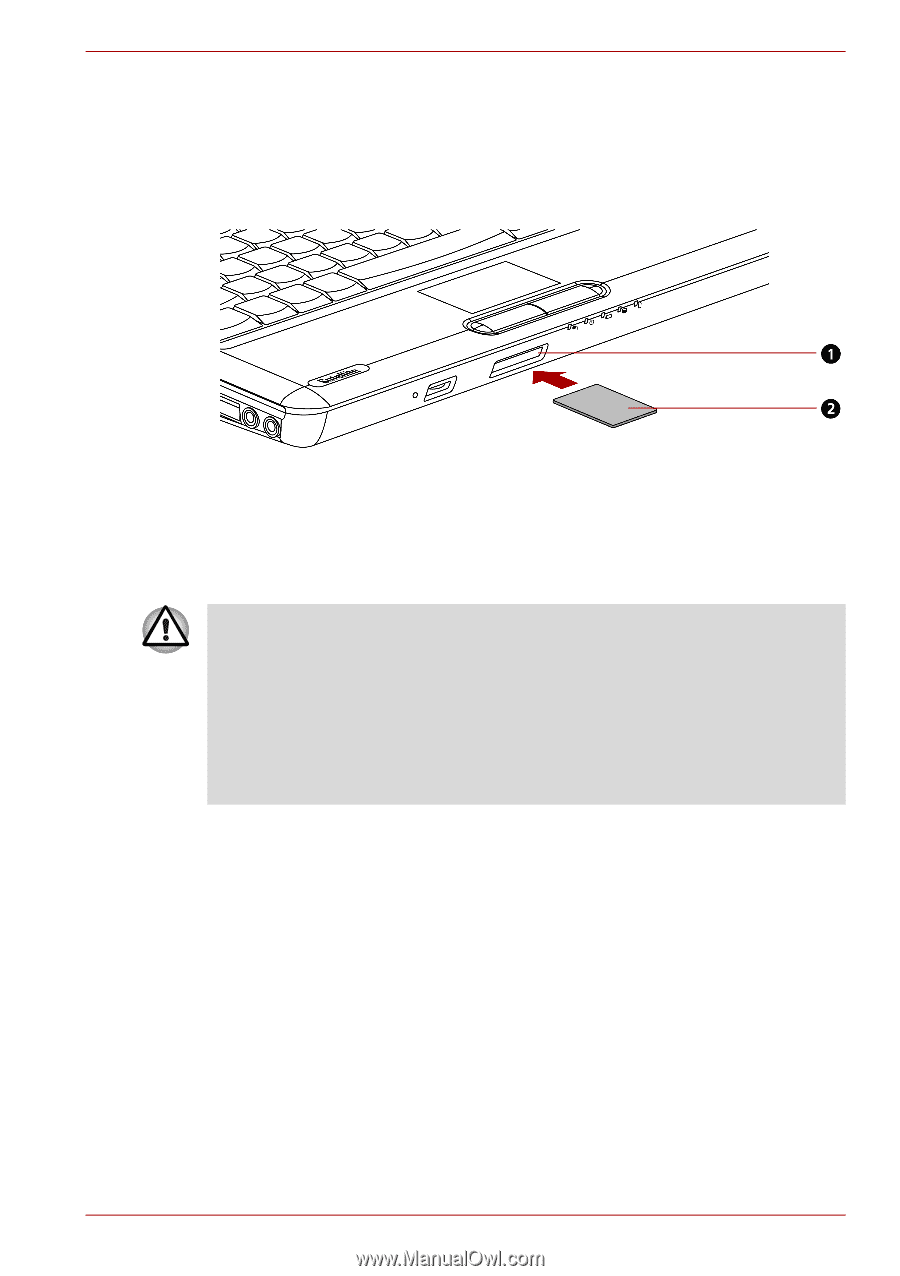
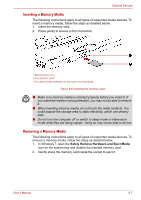
Optional Devices Inserting a Memory Media The following instructions apply to all types of supported media devices. To insert a memory media, follow the steps as detailed below: 1. Insert the memory card. 2. Press gently to ensure a firm connection. 1.BRIDGE MEDIA SLOT 2.THE MEMORY CARD* *THE CARD'S SHAPE DEPENDS ON THE CARD YOU PURCHASED. Figure 8-6 Inserting the memory card ■ Make sure memory media is oriented properly before you insert it. If you insert the media in wrong direction, you may not be able to remove it. ■ When inserting memory media, do not touch the metal contacts. You could expose the storage area to static electricity, which can destroy data. ■ Do not turn the computer off or switch to sleep mode or hibernation mode while files are being copied - doing so may cause data to be lost. Removing a Memory Media The following instructions apply to all types of supported media devices. To remove a memory media, follow the steps as detailed below: 1. In Windows 7, open the Safely Remove Hardware and Eject Media icon on the system tray and disable the inserted memory card. 2. Gently press the memory card inside the socket to eject it. User's Manual 8-7
-
 1
1 -
2
-
3
-
4
-
5
-
6
-
7
-
8
-
9
-
10
-
11
-
12
-
13
-
14
-
15
-
16
-
17
-
18
-
19
-
20
-
21
-
22
-
23
-
24
-
25
-
26
-
27
-
28
-
29
-
30
-
31
-
32
-
33
-
34
-
35
-
36
-
37
-
38
-
39
-
40
-
41
-
42
-
43
-
44
-
45
-
46
-
47
-
48
-
49
-
50
-
51
-
52
-
53
-
54
-
55
-
56
-
57
-
58
-
59
-
60
-
61
-
62
-
63
-
64
-
65
-
66
-
67
-
68
-
69
-
70
-
71
-
72
-
73
-
74
-
75
-
76
-
77
-
78
-
79
-
80
-
81
-
82
-
83
-
84
-
85
-
86
-
87
-
88
-
89
-
90
-
91
-
92
-
93
-
94
-
95
-
96
-
97
-
98
-
99
-
100
-
101
-
102
-
103
-
104
-
105
-
106
-
107
-
108
-
109
-
110
-
111
-
112
-
113
-
114
-
115
-
116
-
117
-
118
-
119
-
120
-
121
-
122
-
123
-
124
-
125
-
126
-
 127
127 -
 128
128 -
 129
129 -
 130
130 -
 131
131 -
 132
132 -
 133
133 -
 134
134 -
 135
135 -
 136
136 -
 137
137 -
138
-
139
-
140
-
141
-
142
-
143
-
144
-
145
-
146
-
147
-
148
-
149
-
150
-
151
-
152
-
153
-
154
-
155
-
156
-
157
-
158
-
159
-
160
-
161
-
162
-
163
-
164
-
165
-
166
-
167
-
168
-
169
-
170
-
171
-
172
-
173
-
174
-
175
-
176
-
177
-
178
-
179
-
180
-
181
-
182
-
183
-
184
-
185
-
186
-
187
-
188
-
189
-
190
 |
 |