Toshiba Satellite P300 PSPCCA-0C502H Users Manual Canada; English - Page 76
System Recovery Options, Restoring the preinstalled software from the Recovery HDD
 |
View all Toshiba Satellite P300 PSPCCA-0C502H manuals
Add to My Manuals
Save this manual to your list of manuals |
Page 76 highlights
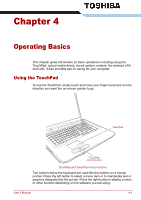
Getting Started System Recovery Options The System Recovery Options feature is installed on the hard disk when shipped from the factory. The System Recovery Options menu includes some tools to repair startup problems, run diagnostics or restore the system. You can see the more information about "Startup Repair" in "Windows Help and Support" content. The System Recovery Options can also be run manually to repair problems. The procedure is as follows. Follow the instructions shown on the onscreen menu. 1. Turn off the computer. 2. While holding the F8 key, turn the computer on. 3. The Advanced Boot Options menu will be displayed. Use the arrow keys to select Repair Your Computer and press Enter. 4. Follow the on-screen instructions. The Windows Vista CompletePC Backup feature can be used on Windows Vista™ Business Edition and Ultimate Edition. Restoring the preinstalled software from the Recovery HDD Part of the space on the hard disk drive is reserved as recovery partition for restoring the pre-installed software from the hard disk drive. When re-setting up your hard disk, do not change, delete or add partitions in a manner other than specified in the manual. Otherwise, space for software may be destroyed. In addition, if you use a third-party partitioning program to reconfigure partitions on your hard disk, it may become impossible to re-setup your computer. 1. Turn off your computer. 2. Hold down the 0 (zero) key on the keyboard and turn on your computer. When "TOSHIBA Leading Innovation >>>" appears, release the 0 (zero) key on the keyboard. 3. A menu appears. Follow the on-screen instructions. You can not use System Recovery Options if restoring the pre-installed software without System Recovery Options. When you reinstall the Windows operating system, the hard disk will be reformatted and all data will be lost. 3-10 User's Manual
-
 1
1 -
2
-
3
-
4
-
5
-
6
-
7
-
8
-
9
-
10
-
11
-
12
-
13
-
14
-
15
-
16
-
17
-
18
-
19
-
20
-
21
-
22
-
23
-
24
-
25
-
26
-
27
-
28
-
29
-
30
-
31
-
32
-
33
-
34
-
35
-
36
-
37
-
38
-
39
-
40
-
41
-
42
-
43
-
44
-
45
-
46
-
47
-
48
-
49
-
50
-
51
-
52
-
53
-
54
-
55
-
56
-
57
-
58
-
59
-
60
-
61
-
62
-
63
-
64
-
65
-
66
-
67
-
68
-
69
-
70
-
 71
71 -
 72
72 -
 73
73 -
 74
74 -
 75
75 -
 76
76 -
 77
77 -
 78
78 -
 79
79 -
 80
80 -
 81
81 -
82
-
83
-
84
-
85
-
86
-
87
-
88
-
89
-
90
-
91
-
92
-
93
-
94
-
95
-
96
-
97
-
98
-
99
-
100
-
101
-
102
-
103
-
104
-
105
-
106
-
107
-
108
-
109
-
110
-
111
-
112
-
113
-
114
-
115
-
116
-
117
-
118
-
119
-
120
-
121
-
122
-
123
-
124
-
125
-
126
-
127
-
128
-
129
-
130
-
131
-
132
-
133
-
134
-
135
-
136
-
137
-
138
-
139
-
140
-
141
-
142
-
143
-
144
-
145
-
146
-
147
-
148
-
149
-
150
-
151
-
152
-
153
-
154
-
155
-
156
-
157
-
158
-
159
-
160
-
161
-
162
-
163
-
164
-
165
-
166
-
167
-
168
-
169
-
170
-
171
-
172
-
173
-
174
-
175
-
176
-
177
-
178
-
179
-
180
-
181
-
182
-
183
-
184
-
185
-
186
-
187
-
188
-
189
-
190
-
191
-
192
-
193
-
194
-
195
-
196
-
197
-
198
-
199
-
200
-
201
-
202
-
203
-
204
-
205
-
206
-
207
-
208
 |
 |
