Toshiba Satellite Pro L650 PSK1KC-03W02S Users Manual Canada; English - Page 87
Disconnecting an eSATA device, Connecting the HDMI out port, Safely Remove Hardware and Eject Media
 |
View all Toshiba Satellite Pro L650 PSK1KC-03W02S manuals
Add to My Manuals
Save this manual to your list of manuals |
Page 87 highlights
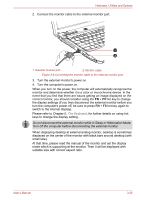
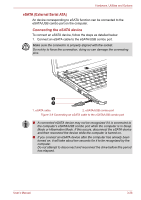
Hardware, Utilities and Options Disconnecting an eSATA device When you have finished using an eSATA device, you can follow the procedures below in order to disconnect it: 1. Wait for the indicator light of an eSATA device to go out to make sure all activity has stopped. If you disconnect an eSATA device or turn off the power while the computer is accessing the drive you may lose data or damage an eSATA device or the drive. 2. Click the Safely Remove Hardware and Eject Media icon on the Windows Taskbar. 3. Click an eSATA device that you want to remove. 4. Carefully pull an eSATA device's eSATA/USB combo connector out from within the computer's eSATA/USB combo port. HDMI A HDMI monitor can be connected to the HDMI out port on the computer. To connect monitor, follow the steps as detailed below: As the port operation of all HDMI (High-Definition Multimedia Interface) monitors have not been confirmed, some HDMI monitors may not function properly. Connecting the HDMI out port 1. Plug one end of the HDMI cable into the HDMI out port of the HDMI device. 2. Plug the other end of the HDMI cable into the HDMI out port on your computer. 1 2 1. HDMI out port 2. HDMI cable Figure 3-10 Connecting the HDMI out port User's Manual 3-27
-
 1
1 -
2
-
3
-
4
-
5
-
6
-
7
-
8
-
9
-
10
-
11
-
12
-
13
-
14
-
15
-
16
-
17
-
18
-
19
-
20
-
21
-
22
-
23
-
24
-
25
-
26
-
27
-
28
-
29
-
30
-
31
-
32
-
33
-
34
-
35
-
36
-
37
-
38
-
39
-
40
-
41
-
42
-
43
-
44
-
45
-
46
-
47
-
48
-
49
-
50
-
51
-
52
-
53
-
54
-
55
-
56
-
57
-
58
-
59
-
60
-
61
-
62
-
63
-
64
-
65
-
66
-
67
-
68
-
69
-
70
-
71
-
72
-
73
-
74
-
75
-
76
-
77
-
78
-
79
-
80
-
81
-
 82
82 -
 83
83 -
 84
84 -
 85
85 -
 86
86 -
 87
87 -
 88
88 -
 89
89 -
 90
90 -
 91
91 -
 92
92 -
93
-
94
-
95
-
96
-
97
-
98
-
99
-
100
-
101
-
102
-
103
-
104
-
105
-
106
-
107
-
108
-
109
-
110
-
111
-
112
-
113
-
114
-
115
-
116
-
117
-
118
-
119
-
120
-
121
-
122
-
123
-
124
-
125
-
126
-
127
-
128
-
129
-
130
-
131
-
132
-
133
-
134
-
135
-
136
-
137
-
138
-
139
-
140
-
141
-
142
-
143
-
144
-
145
-
146
-
147
-
148
-
149
-
150
-
151
-
152
-
153
-
154
-
155
-
156
-
157
-
158
-
159
-
160
-
161
-
162
-
163
-
164
-
165
-
166
-
167
-
168
-
169
-
170
-
171
-
172
-
173
-
174
-
175
-
176
-
177
-
178
-
179
-
180
-
181
-
182
-
183
-
184
-
185
-
186
-
187
-
188
-
189
-
190
-
191
-
192
-
193
-
194
-
195
-
196
-
197
 |
 |