Toshiba Tecra M9 PTM90C-TG609C Users Manual Canada; English - Page 77
Hard disk drive pack, Removing the hard disk drive pack
 |
View all Toshiba Tecra M9 PTM90C-TG609C manuals
Add to My Manuals
Save this manual to your list of manuals |
Page 77 highlights
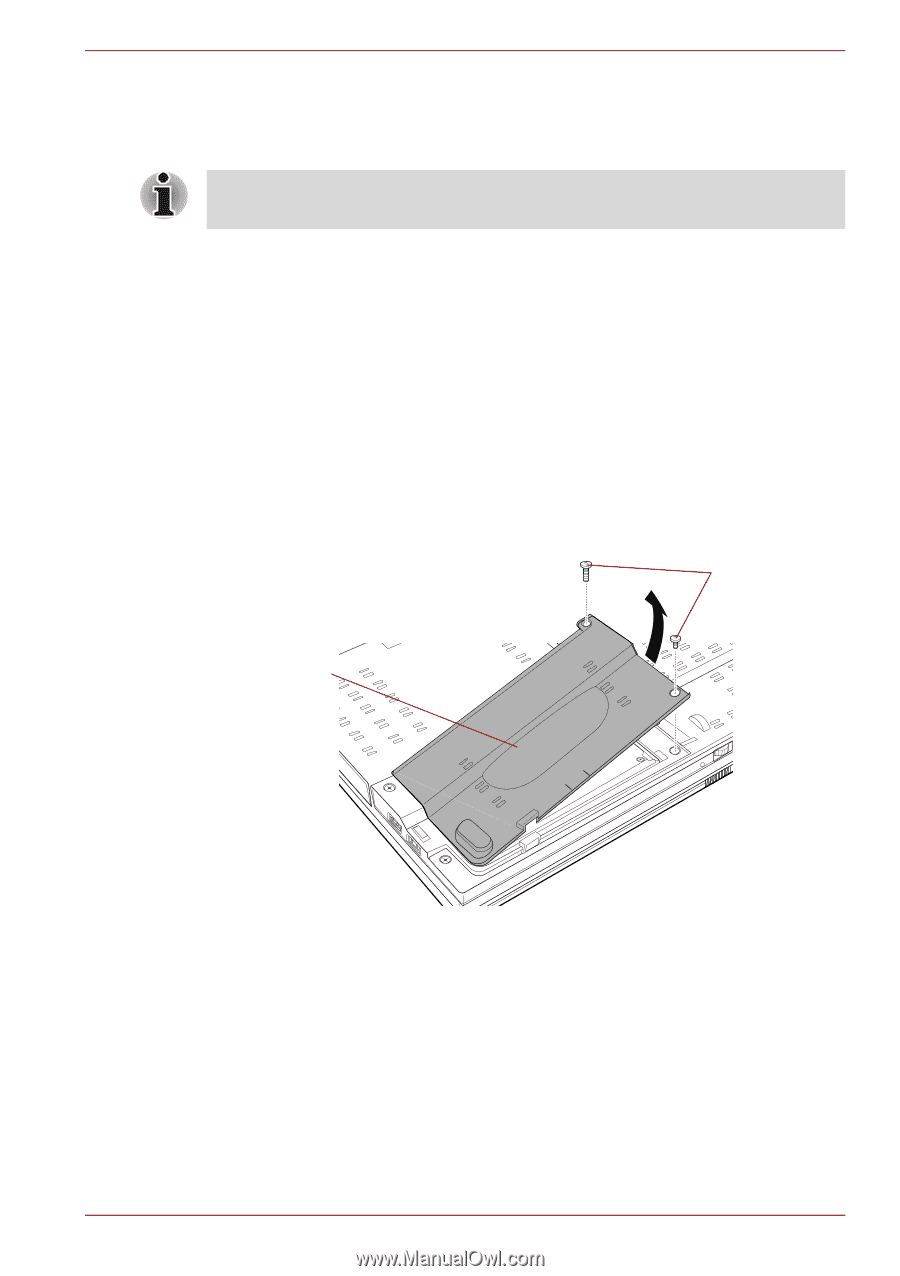
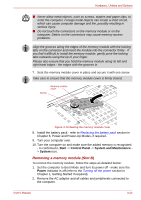
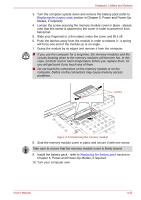
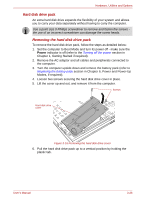
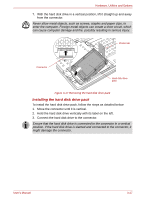
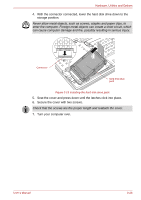
Hardware, Utilities and Options Hard disk drive pack An extra hard disk drive expands the flexibility of your system and allows you to carry your data separately without having to carry the computer. Use a point size 0 Phillips screwdriver to remove and fasten the screws the use of an incorrect screwdriver can damage the screw heads. Removing the hard disk drive pack To remove the hard disk drive pack, follow the steps as detailed below: 1. Set the computer to Boot Mode and turn its power off - make sure the Power indicator is off (refer to the Turning off the power section in Chapter 1, Getting Started if required). 2. Remove the AC adaptor and all cables and peripherals connected to the computer. 3. Turn the computer upside down and remove the battery pack (refer to Replacing the battery pack section in Chapter 6, Power and Power-Up Modes, if required). 4. Loosen two screws securing the hard disk drive cover in place. 5. Lift the cover up and out, and remove it from the computer. Screws Hard disk drive cover Figure 3-16 Removing the hard disk drive cover 6. Pull the hard disk drive pack up to a vertical position by holding the plastic tab. User's Manual 3-26
-
 1
1 -
2
-
3
-
4
-
5
-
6
-
7
-
8
-
9
-
10
-
11
-
12
-
13
-
14
-
15
-
16
-
17
-
18
-
19
-
20
-
21
-
22
-
23
-
24
-
25
-
26
-
27
-
28
-
29
-
30
-
31
-
32
-
33
-
34
-
35
-
36
-
37
-
38
-
39
-
40
-
41
-
42
-
43
-
44
-
45
-
46
-
47
-
48
-
49
-
50
-
51
-
52
-
53
-
54
-
55
-
56
-
57
-
58
-
59
-
60
-
61
-
62
-
63
-
64
-
65
-
66
-
67
-
68
-
69
-
70
-
71
-
 72
72 -
 73
73 -
 74
74 -
 75
75 -
 76
76 -
 77
77 -
 78
78 -
 79
79 -
 80
80 -
 81
81 -
 82
82 -
83
-
84
-
85
-
86
-
87
-
88
-
89
-
90
-
91
-
92
-
93
-
94
-
95
-
96
-
97
-
98
-
99
-
100
-
101
-
102
-
103
-
104
-
105
-
106
-
107
-
108
-
109
-
110
-
111
-
112
-
113
-
114
-
115
-
116
-
117
-
118
-
119
-
120
-
121
-
122
-
123
-
124
-
125
-
126
-
127
-
128
-
129
-
130
-
131
-
132
-
133
-
134
-
135
-
136
-
137
-
138
-
139
-
140
-
141
-
142
-
143
-
144
-
145
-
146
-
147
-
148
-
149
-
150
-
151
-
152
-
153
-
154
-
155
-
156
-
157
-
158
-
159
-
160
-
161
-
162
-
163
-
164
-
165
-
166
-
167
-
168
-
169
-
170
-
171
-
172
-
173
-
174
-
175
-
176
-
177
-
178
-
179
-
180
-
181
-
182
-
183
-
184
-
185
-
186
-
187
-
188
-
189
-
190
-
191
-
192
-
193
-
194
-
195
-
196
-
197
-
198
-
199
-
200
-
201
-
202
-
203
-
204
-
205
-
206
-
207
-
208
-
209
-
210
-
211
-
212
-
213
-
214
-
215
-
216
-
217
-
218
-
219
-
220
-
221
-
222
-
223
-
224
-
225
-
226
-
227
-
228
-
229
-
230
-
231
-
232
-
233
-
234
-
235
-
236
-
237
-
238
-
239
-
240
 |
 |