Tripp Lite INTERNET350U Owner's Manual for Internet Office & BC Personal U - Page 3
Optional Installation, Basic Operation - battery
 |
View all Tripp Lite INTERNET350U manuals
Add to My Manuals
Save this manual to your list of manuals |
Page 3 highlights
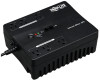
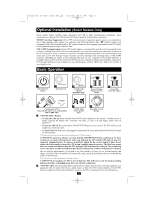
200611001 93-2641 350U OM.qxd 1/4/2007 2:16 PM Page 3 Optional Installation (Select Models Only) Select models feature Tel/DSL surge suppression and USB or DB9 communication capabilities. These connections are optional. The UPS System will function properly without these connections. Tel/DSL Line Surge Suppression: Select UPS models can protect equipment against surges over a single phone line. Using telephone cords, connect your wall jack to the UPS jack marked with a " " symbol. Connect your equipment to the UPS jack marked with a " " symbol. Make sure the equipment you connect to the UPS's jacks is also protected against surges on the AC line. USB or DB9 Communications: Select UPS models feature a communication port that can be connected to any computer, enabling PowerAlert Software to automatically save open files and perform unattended shutdown in the event of a power failure. Connect one end of the included communication cable to the communication port on the side of your UPS System. Connect the other end of the included cable (featuring either a USB or DB9 connector, depending on model) to the communication port on your computer. If PowerAlert Software is included with your UPS, insert the CD into the CD tray of your computer and follow the installation instructions. If PowerAlert Software is not included, you can download the software FREE from Tripp Lite's website at www.tripplite.com. Basic Operation 1 ON/OFF/TEST Button 2 ON/OFF LED 3 OVERLOAD/ CHECK BATTERY LED 4 Battery Backup/ Surge Protected Outlets 5 Surge-Only Protected Outlets 6 Communication Port (Select models only. For use with included USB or DB9 cable.) 7 Tel/DSL Jacks (Select models only.) 8 Resettable Circuit Breaker 1 "ON/OFF/TEST" Button • To turn the UPS on: Press and hold the ON/OFF/TEST Button for one second.* If utility power is absent, pressing the Button will "cold-start" the UPS, i.e. turn it on and supply power from its batteries.** • To turn the UPS off: Press and hold the ON/OFF/TEST Button for one second.* The UPS will be turned completely off (deactivated). • To run a Self-Test: With your UPS plugged in and turned ON, press and hold the ON/OFF/TEST button for three seconds. * The alarm will beep once briefly after one second has passed. **If fully charged. CAUTION! To perform a self-test, you must hold the ON/OFF/TEST button continuously for three seconds; if you release the button too early, you will turn the UPS system OFF and cut power to connected equipment loads. To ensure you hold the button for the correct length of time, do not release the button until you hear the UPS System's audible alarm beep twice. The first beep occurs after one second and indicates that the UPS will turn OFF if the button is released. The second beep occurs after three seconds and indicates that the UPS will perform a self-test if the button is released. The test will last approximately 10 seconds as the UPS switches to battery to test its load capacity and charge. All LEDs will be lit and the UPS alarm will sound. See LED descriptions below to determine the results of the Self-Test. Note: You can leave connected equipment on during a self-test. CAUTION! Do not unplug your UPS to test its batteries. This will remove safe electrical grounding and may introduce a damaging surge into your network connections. 2 "ON/OFF" LED: This green LED lights continuously to indicate that the UPS is ON and supplying your equipment with AC power either from a utility source or from the UPS's internal batteries. If the UPS's alarm is sounding (4 short beeps followed by a pause), the UPS is operating from its internal batteries. 3
-
 1
1 -
 2
2 -
 3
3 -
 4
4 -
 5
5 -
 6
6 -
 7
7 -
 8
8 -
 9
9 -
10
-
11
-
12
-
13
-
14
-
15
-
16
 |
 |